
01
Getting started
Install, sign in and download the engine
Escbase starts with a lightweight installer. On first launch, it verifies your account and downloads the video engine for your computer.
macOS
- Download the macOS installerEscbase supports Apple Silicon and Intel on macOS 14 or later.
- Open the DMGDrag Escbase into Applications and open it normally.
Windows
- Download from escbase.xyzChoose Download for Windows. Escbase supports 64-bit Windows 10 and 11.
- Keep the file in Microsoft EdgeThe Windows build is not yet publisher-verified, so Edge may flag an uncommon download. Open the menu beside the file, choose Keep, then Keep anyway if another confirmation appears.
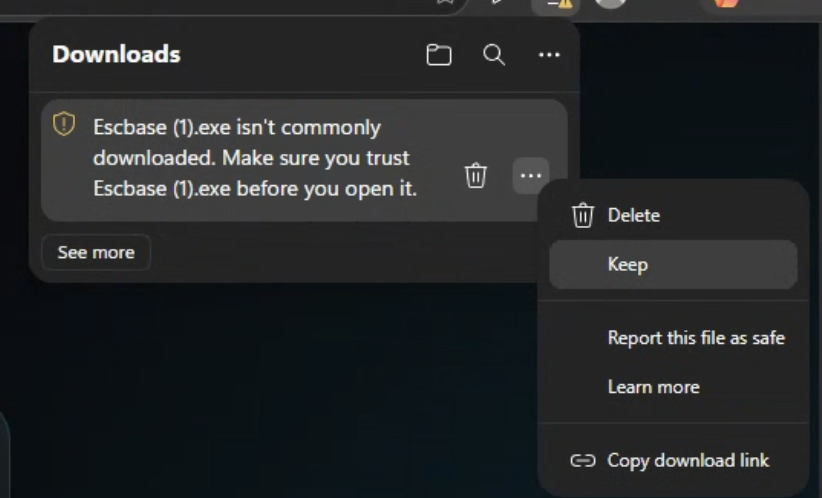
Open the menu beside Escbase.exe and keep the file. 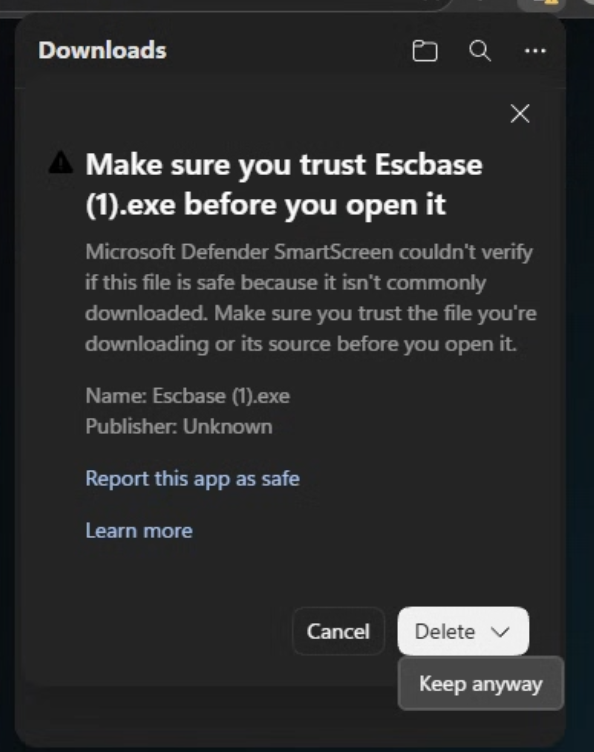
Open the arrow beside Delete and choose Keep anyway. - Open the installerRun Escbase.exe. On Windows protected your PC, choose More info.
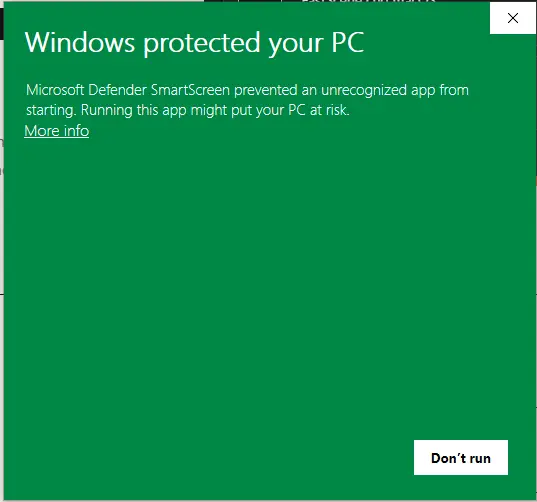
Choose More info on the SmartScreen prompt. - Choose Run anywayConfirm the app name is Escbase and that you downloaded it directly from escbase.xyz, then choose Run anyway.
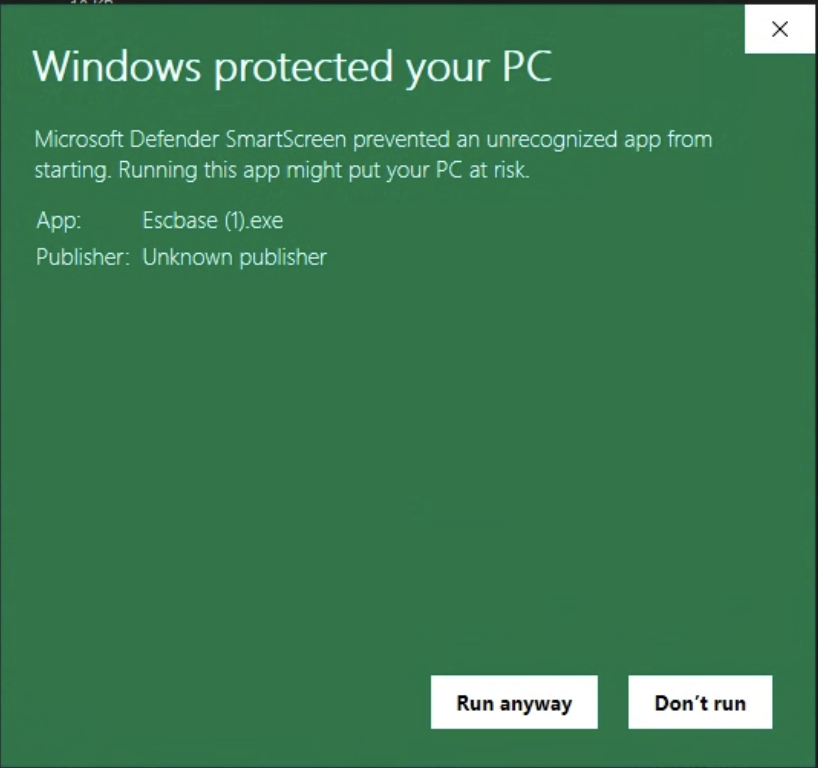
Confirm Escbase.exe and choose Run anyway. - Finish setupLaunch Escbase and keep a stable connection while the lightweight installer downloads the video engine once.

Escbase opens the dashboard after setup and the first engine download.
NoteOnly bypass SmartScreen for an Escbase installer downloaded directly from escbase.xyz. Do not continue with a copy received from an unknown link, email or sender.
Account and license
- Sign in with the same Google account used to buy or renew Escbase.
- Trial has no day limit: 3 successful renders, 720p, Escbase watermark + outro, no batch. Failed or cancelled renders do not use a trial slot.
- Pro Monthly is 30 days; Pro Yearly is 365 days. English checkout uses PayPal ($5 / $20). Vietnamese checkout uses PayOS (49.000đ / 499.000đ). Renewal is manual — no auto-charge.
- A web purchase or renewal normally appears in an open app within about 5 minutes without signing out.
- Template 3 buyers claim 30 days of Pro once in the homepage Claim section with the same Google email.
02
Projects
Create a project with an agent
Escbase has no New Project button. Keep the app open, copy the prompt from Tools, then paste it into Cursor, Claude Code, or Codex.
Steps
- Keep Escbase openLeave the app running while the agent creates the project.
- Open Project creation promptIn Escbase go to Tools → Project creation prompt.
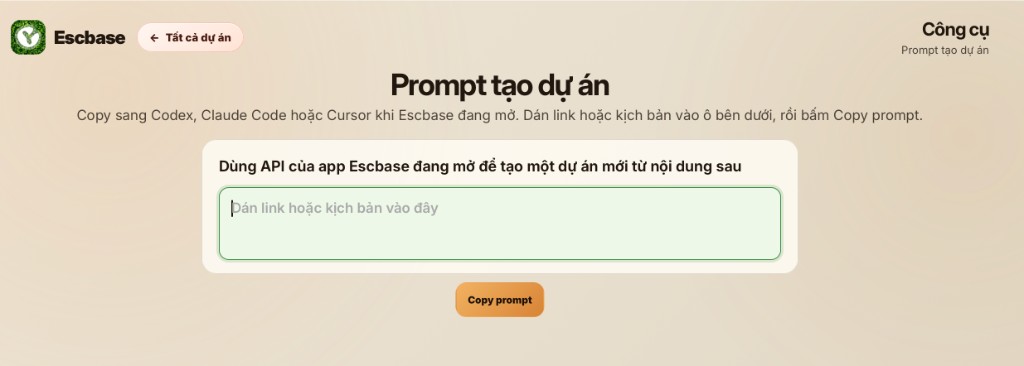
Tools → Project creation prompt — paste a link or script, then Copy prompt. - Paste your contentPaste an article link or your script into the box.
- Copy prompt and send to the agentClick Copy prompt, then paste it into Cursor, Claude Code, or Codex and let the agent run.
- Find the new projectWhen the agent finishes, return to Escbase. If it is missing, click Refresh.
Notes
- You do not need to code — the agent builds the project for you.
- After it appears, open it from All projects to preview and render.
- Projects stay on your computer even if Trial slots run out or Pro expires.
03
Preview Editor
Check captions, music and scenes
Open a project and use Preview Editor before you spend a render. Adjust captions, background music and scene timing while the slide plays locally.
Typical preview pass
- Open the projectPick it from Tất cả dự án / All projects on the dashboard.
- Preview the slidePlay through captions and scenes. Fix text, timing or assets that look wrong before render.
- Save preferencesVoice provider, speed, outro/logo ticks and render size are remembered for the next run (Trial keeps watermark and outro locked on).

04
Voiceover
Choose how the video speaks
Escbase supports Edge TTS, an uploaded voice file, Gemini API and ElevenLabs API. Third-party AI keys are billed by those providers, not by Escbase.
Important — karaoke captions
Add an ElevenLabs API key with the first 3 Access permissions
When rendering with an uploaded audio file or Gemini API, karaoke captions stay word-aligned if you add an ElevenLabs API key and set the first three permissions to Access.
- Text to Speech → Access
- Forced Alignment → Access
- Voice Generation → Access
- Create the keyOpen ElevenLabs → Developers → API Keys and choose Create Key. Set a credit limit if you want to control spend.
- Enable the first 3 permissionsUnder Restrictions, set Text to Speech, Forced Alignment and Voice Generation to Access. Other permissions can stay No access.
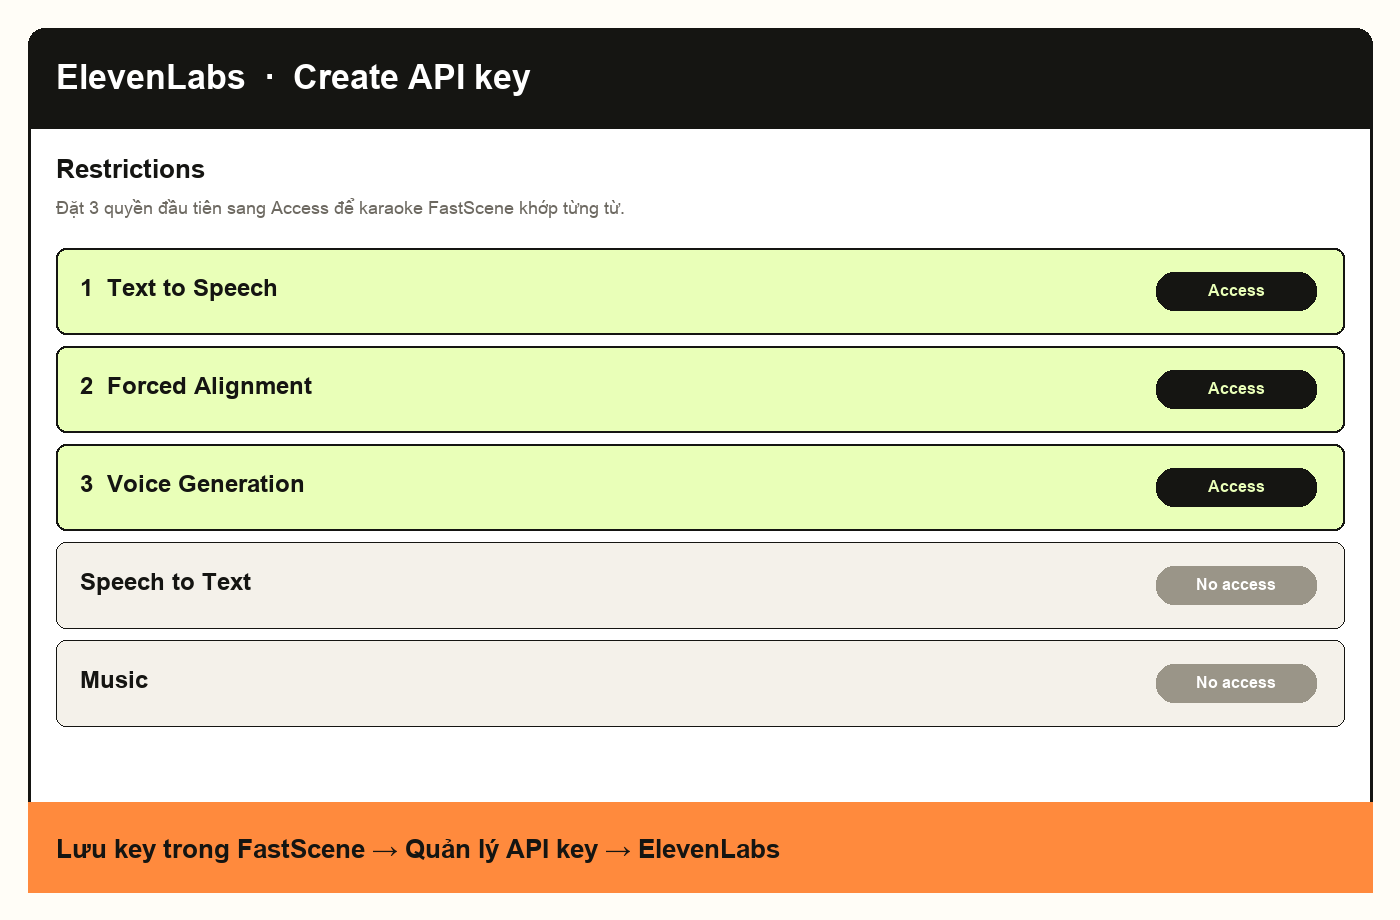
Set the first three permissions to Access. Other permissions can stay No access. - Save it in EscbaseCopy the key, then open Settings / API key management → ElevenLabs and paste it. Escbase uses this key to align karaoke captions.
NoteThe same notice appears in the app when you render with an uploaded file or Gemini. If you use ElevenLabs API for speech, keep these three permissions enabled.
Upload a voice file
- Prepare a full voiceoverThe audio must read the full script in order.
- Choose UploadIn the voice panel, pick an MP3 or WAV. Escbase uses the system file dialog.
- Check captionsWord-accurate karaoke needs the ElevenLabs API key with the first 3 Access permissions in the callout above.
ElevenLabs manual
- Open Text to SpeechSign in to ElevenLabs and open the Text to Speech tool.
- Paste the full scriptPick a voice, preview, choose a model, then Generate speech.
- Download the fileDownload the MP3 and use Upload mode in Escbase.
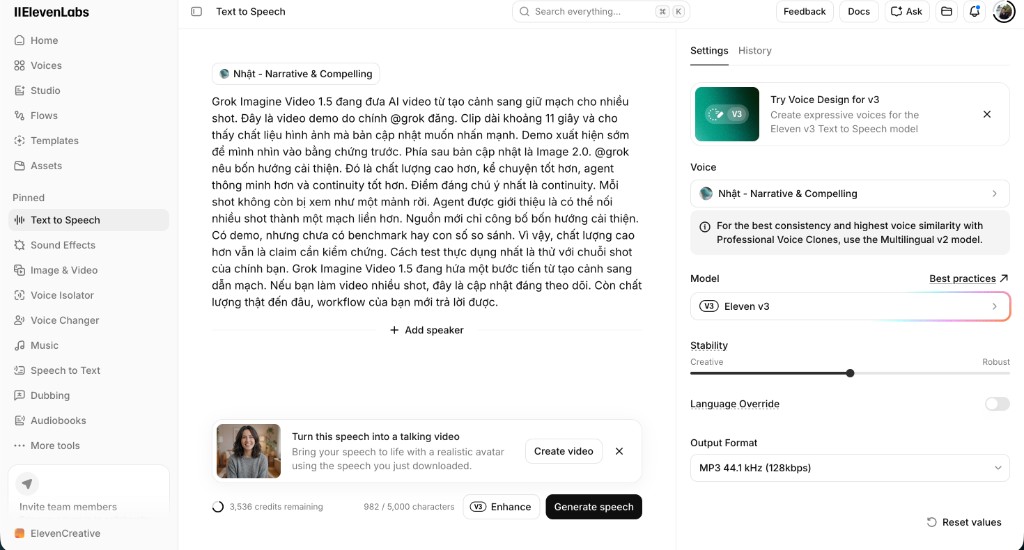
ElevenLabs API
- Create an API keyFollow the callout at the top of this section: Developers → API Keys, enable the first 3 Access permissions.
- Copy a Voice IDIn Voice Library, open the menu for the voice you want and choose Copy voice ID.
- Save it in EscbasePaste the API key and Voice ID in Settings / the voice panel, select ElevenLabs, then generate or render.
Gemini API
- Create a key in Google AI StudioOpen API Keys, choose Create API key, then copy the new key. Do not post the key publicly.
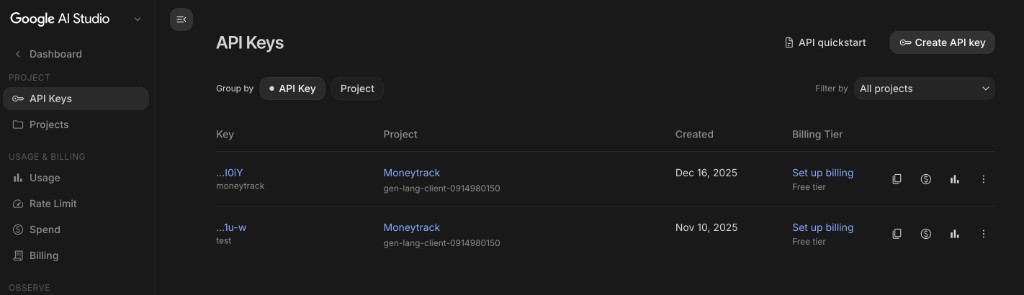
Google AI Studio → API Keys → Create API key. - Add it to EscbaseOpen Settings / API key management → Gemini and paste the key. It stays on your computer.
- Pick a voice and generateSelect Gemini in the voice panel, adjust style if needed, then generate voiceover or render.
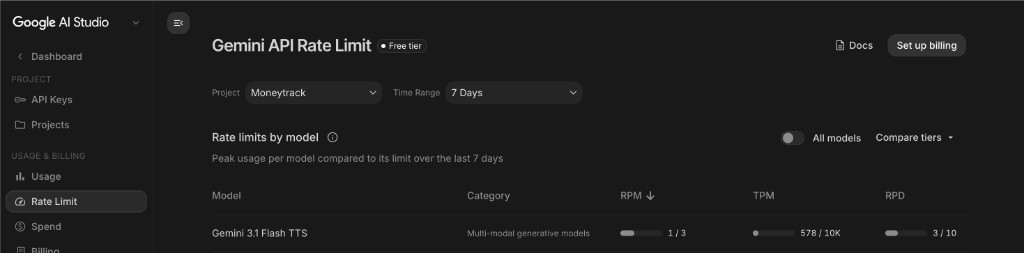
NoteGoogle AI Studio free accounts get about 10 Gemini TTS calls per day. When the quota resets, wait for the next day or set up billing on Google.
Edge TTS
- No API key required. Pick a Vietnamese or English voice and generate.
- Your computer still needs a network connection for Microsoft voices.
- Good for a first Trial render with no Escbase fee.
05
Render
Export the final video
Render runs on your machine. Escbase asks the website for a short-lived export permit, then writes output/final_video.mp4 inside the project folder.
Single render
- Stay signed inYou must be signed in with Google. If the app says the Google session is invalid, sign out and sign in again.
- Start RenderConfirm voice, size and branding options, then start render.
- Watch or open the folderWhen the job finishes and status shows Ready, click Mở to play the final video, or File to open the folder that contains it.
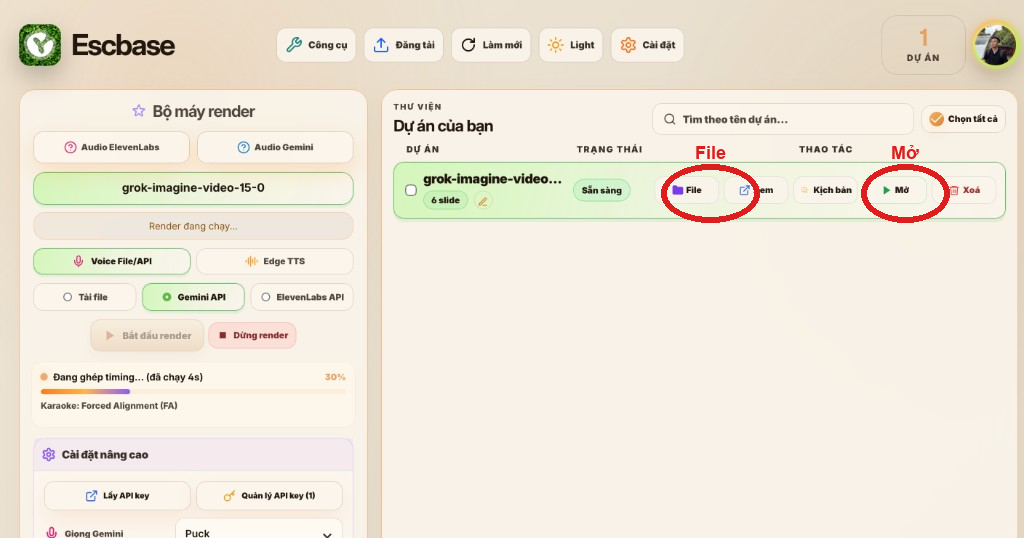
After render: Mở plays the video; File opens the project folder.
NoteTrial is locked to 720p with watermark and Escbase outro. Pro removes those and unlocks higher resolution and batch when available.
Stop a bad run
- Use Stop Render if something looks wrong — cancelled jobs do not use a trial slot.
- Do not force-quit mid-render unless the app is frozen; prefer Stop so the permit can finish cleanly.
06
Publish
Upload Center
Prepare title, description and captions, then send the rendered MP4 to YouTube or Facebook without leaving Escbase. Publishing needs an active Pro plan.
Before you upload
- Finish a successful render so final_video.mp4 exists.
- Confirm Pro is active on the same Google account.
- Connect at least one YouTube channel or Facebook Page in Upload Center.
Accounts
- YouTube: set OAuth Client ID/Secret once (Khoá OAuth), then Add channel.
- Facebook: Add Page and complete the Meta login flow.
- You can keep several channels/Pages and remove any row with Xoá.

07
YouTube
Connect the YouTube Data API
Set up Google Cloud once, then add and switch channels from Upload Center.
1. Create the project and enable the API
- Create or select a projectOpen Google Cloud Console and create a dedicated project, or select one you already use.
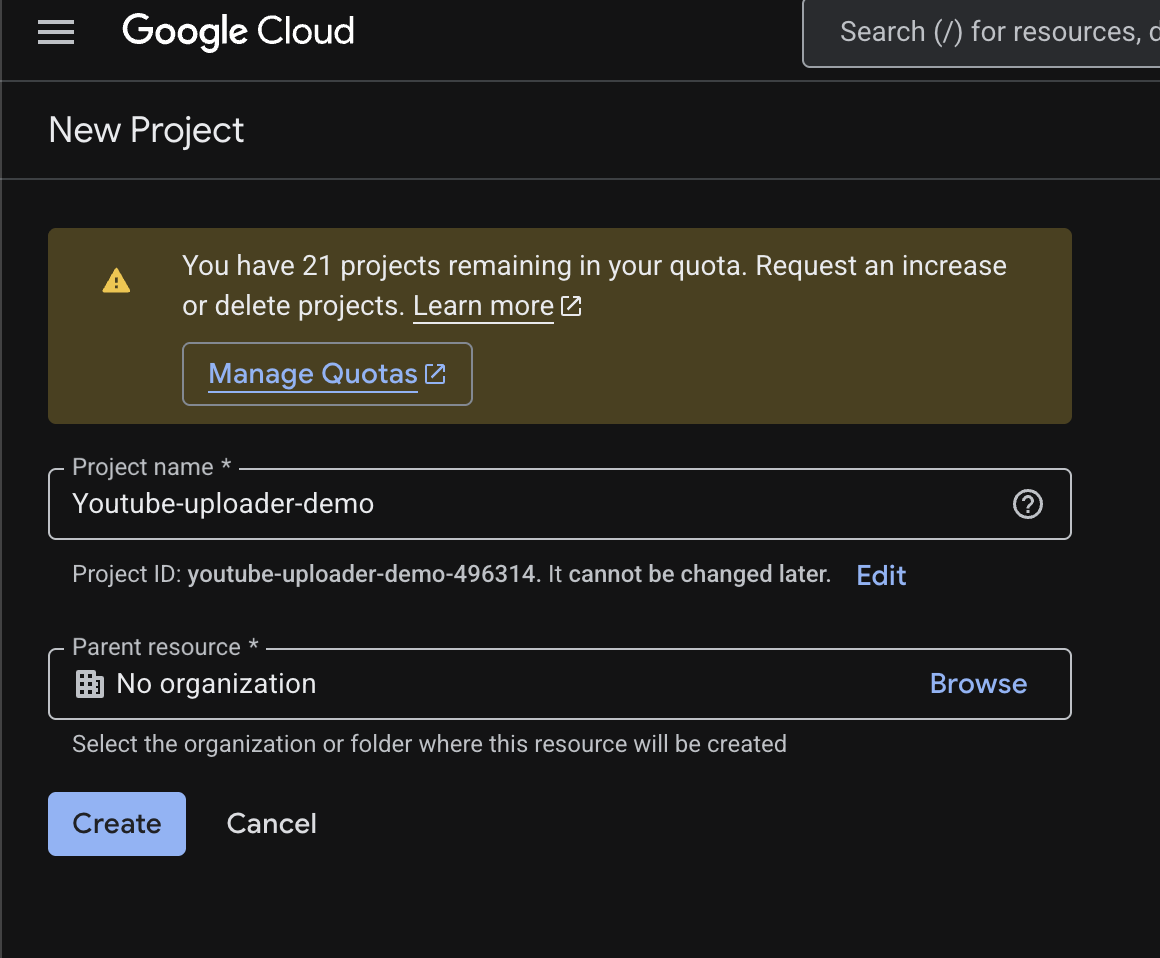
Create or select the Google Cloud project used by Upload Center. - Open API LibraryGo to APIs & Services → Library and search for YouTube Data API v3.
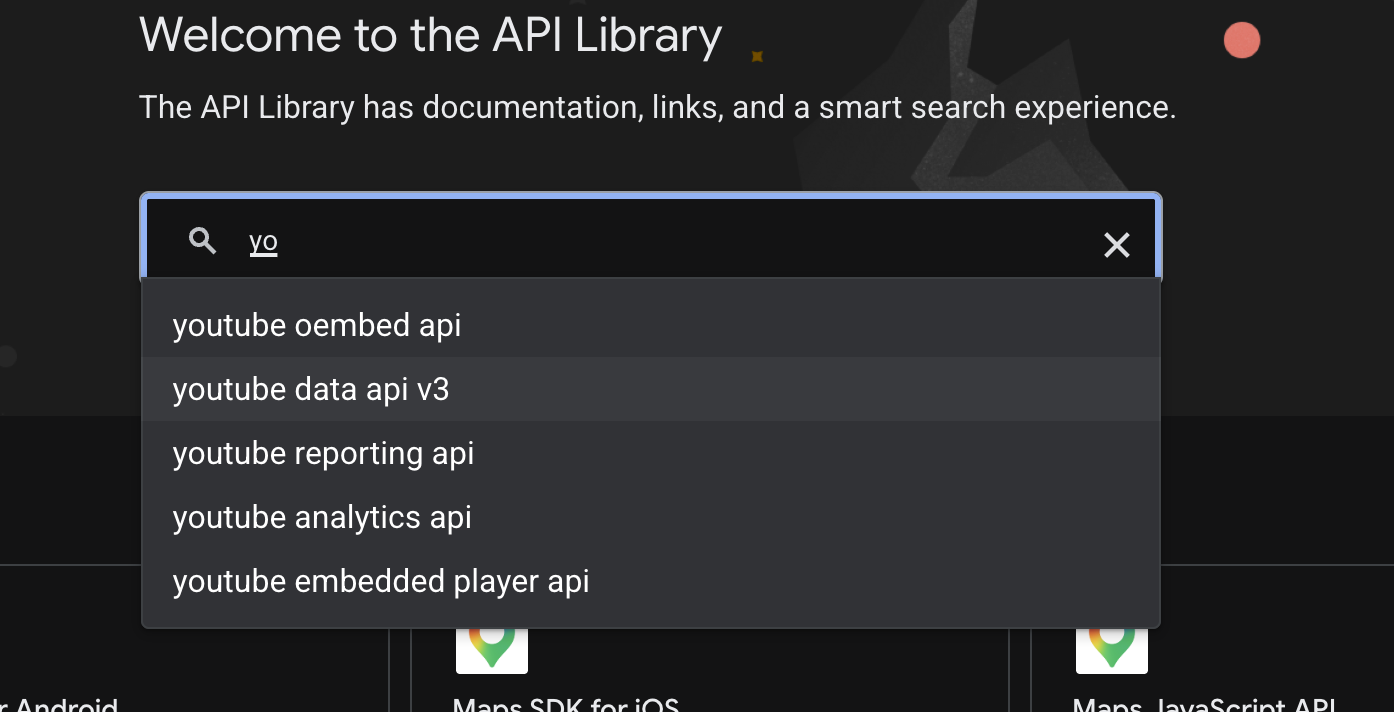
Find YouTube Data API v3 in API Library. - Enable the APIOpen its Product details page and choose Enable.
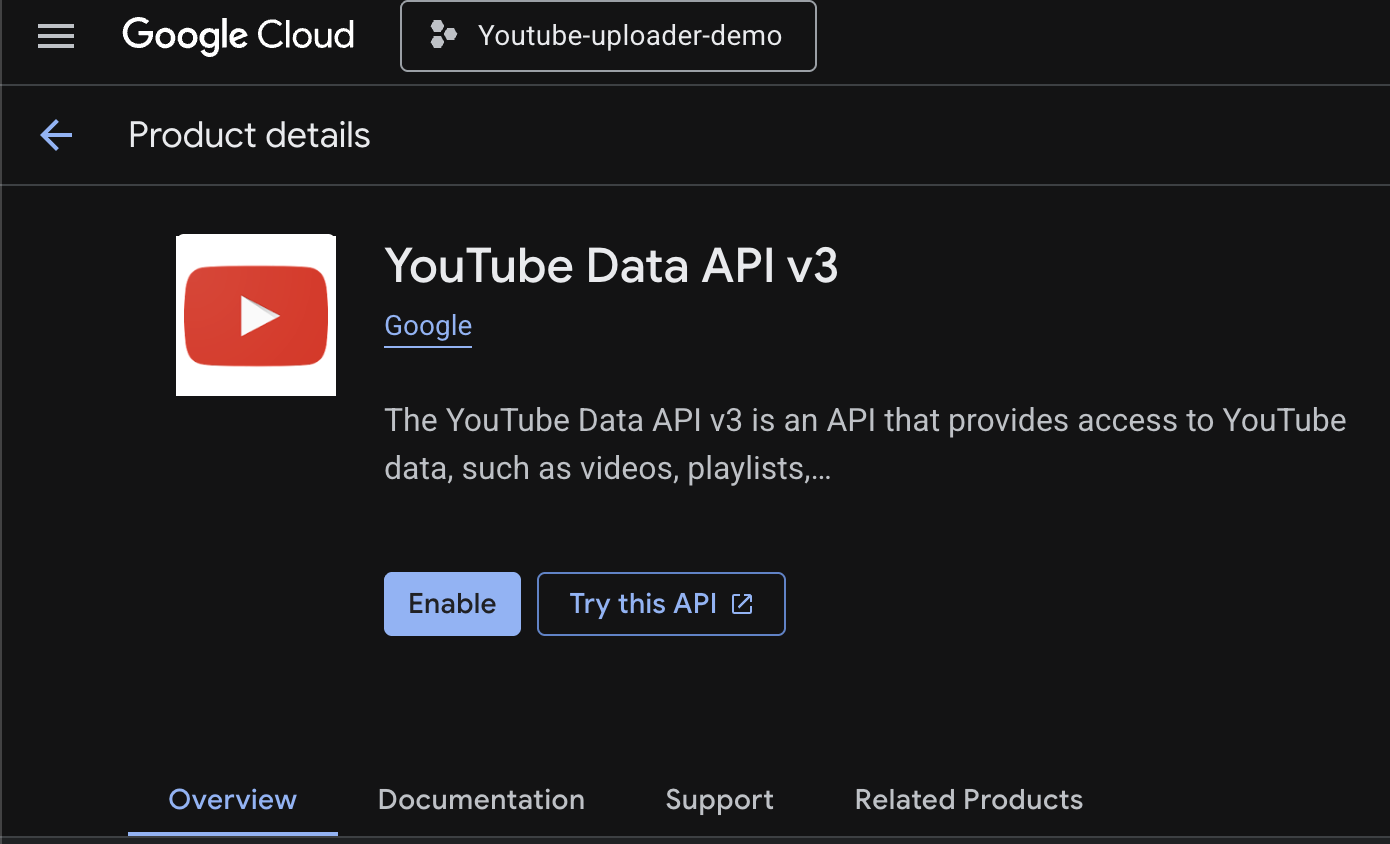
Open Product details and choose Enable.
2. Configure OAuth consent
- Start the consent screenOpen OAuth consent screen → Get Started, then enter the app name, support email and developer contact email.
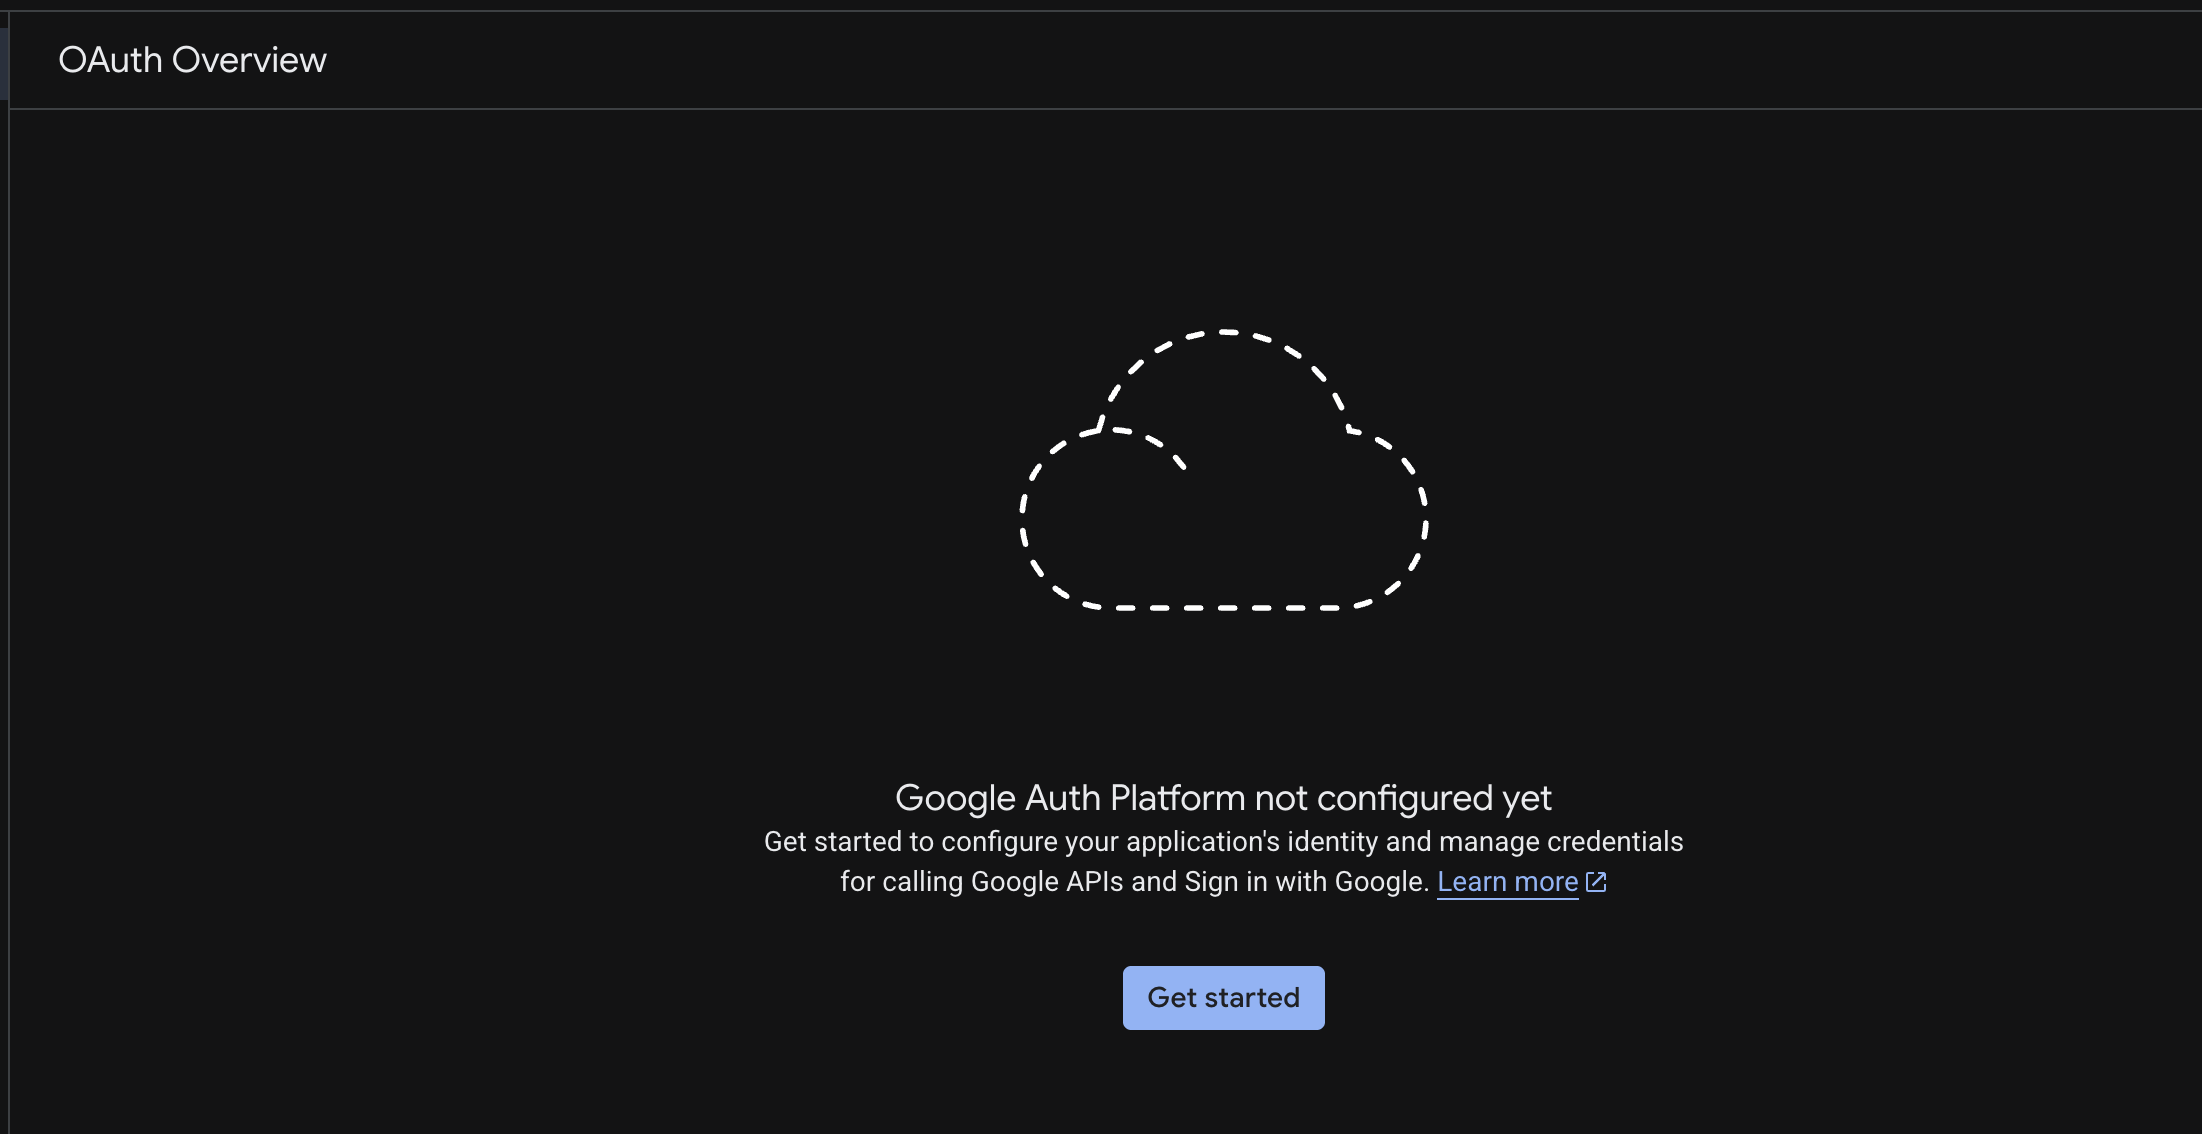
Configure OAuth consent before creating the Web application client. - Choose ExternalUse External for regular Google accounts or accounts outside your organization.
- Add test usersWhile the app is in Testing, add every Google account that needs to connect a channel.
- Move to In productionOnce setup works, change Publishing status to In production. External apps left in Testing can have refresh tokens limited to about 7 days.
NoteIn production does not make a token permanent. Google can still revoke access after security changes, user revocation or long inactivity.
3. Create the OAuth client
- Open ClientsChoose Clients → Create Client and use Web application as the application type.
- Add the callbackPaste the exact Escbase URI below into Authorized redirect URIs.
- Save the credentialsCopy the Client ID and Client Secret and keep both private.
http://localhost:8765/api/social/youtube/callbackNoteThe redirect URI must match exactly, including http, localhost, port 8765 and the path.
4. Connect the channel in Escbase
- Open Upload Center with a project that already has output/final_video.mp4.
- Open OAuth key or Add channel, paste the Client ID and Client Secret, then Save and connect.
- Sign in to the Google account that can upload to the channel and approve the requested YouTube scopes.
- Review title, description, visibility or schedule, then upload.
5. Common OAuth issues
- redirect_uri_mismatch: the Google Cloud URI must exactly match the localhost:8765 callback in Escbase.
- No refresh_token: remove the old app under Google Account → Security → Third-party access, then add the channel again.
- invalid_grant or revoked token: reconnect. If it repeats after about 7 days, move the consent screen out of Testing.
- Another account cannot sign in: add it as a Test user or move the app to In production; Google may require verification depending on distribution and scopes.
08Facebook
Connect a Page for Reels
Escbase uses the Facebook Reels Publishing API. Save a Page ID and Page access token in Upload Center. To publish for Pages outside the app team, the Meta app must be Live.
1. Create the Meta app
- Create AppOpen Meta for Developers → My Apps → Create App.
- Choose the Page use caseFilter Content management and select Manage everything on your Page. This is the use case used to publish Page content and video.
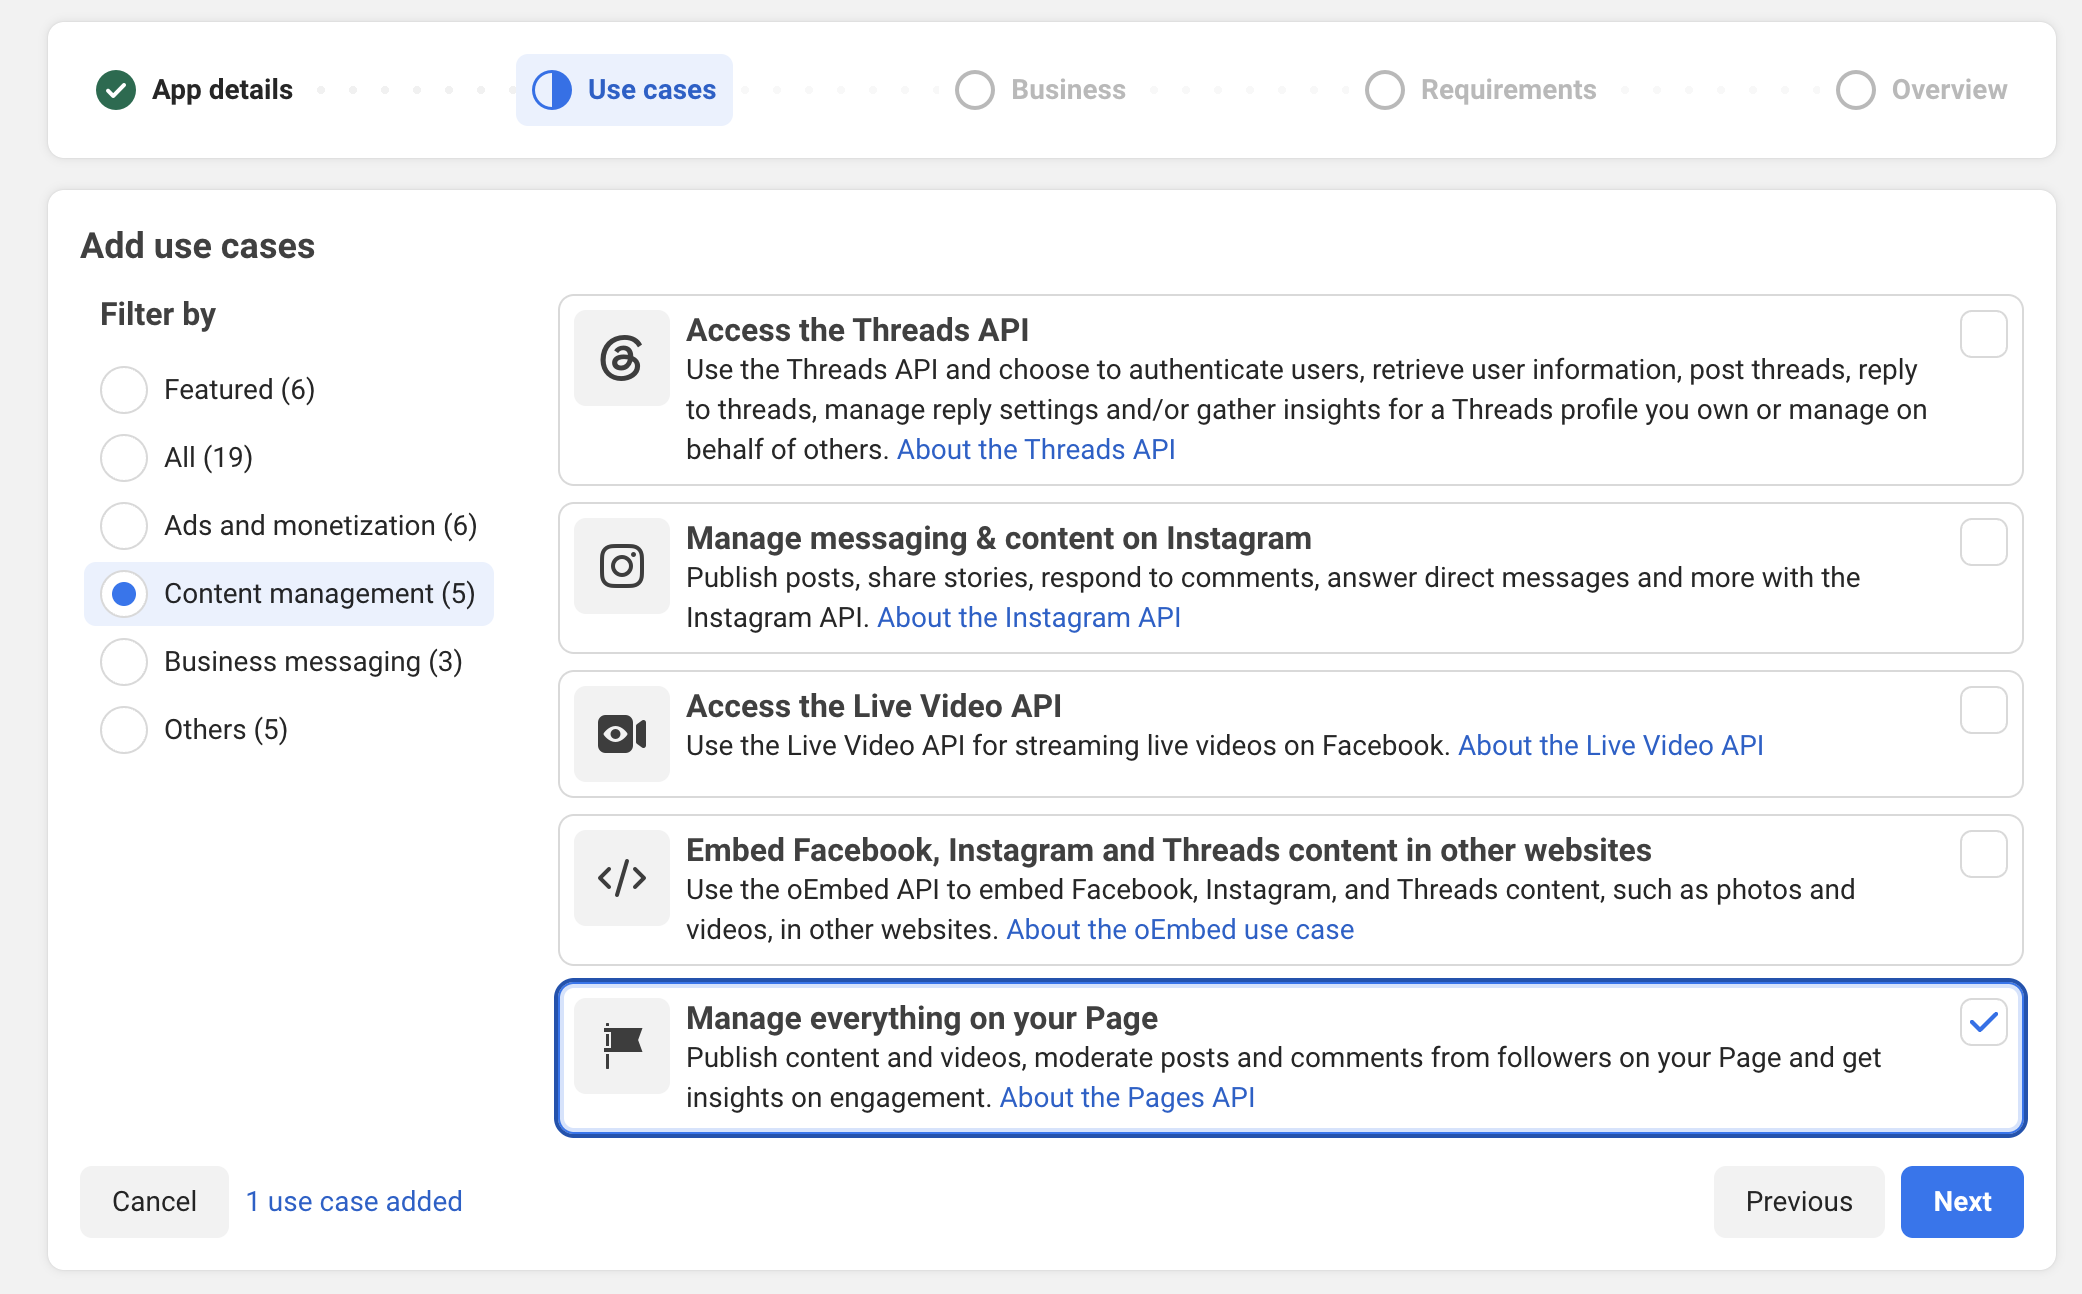
Choose Manage everything on your Page, then Next. - Choose a Business portfolioSelect the portfolio that manages the Page, or continue without one when appropriate.
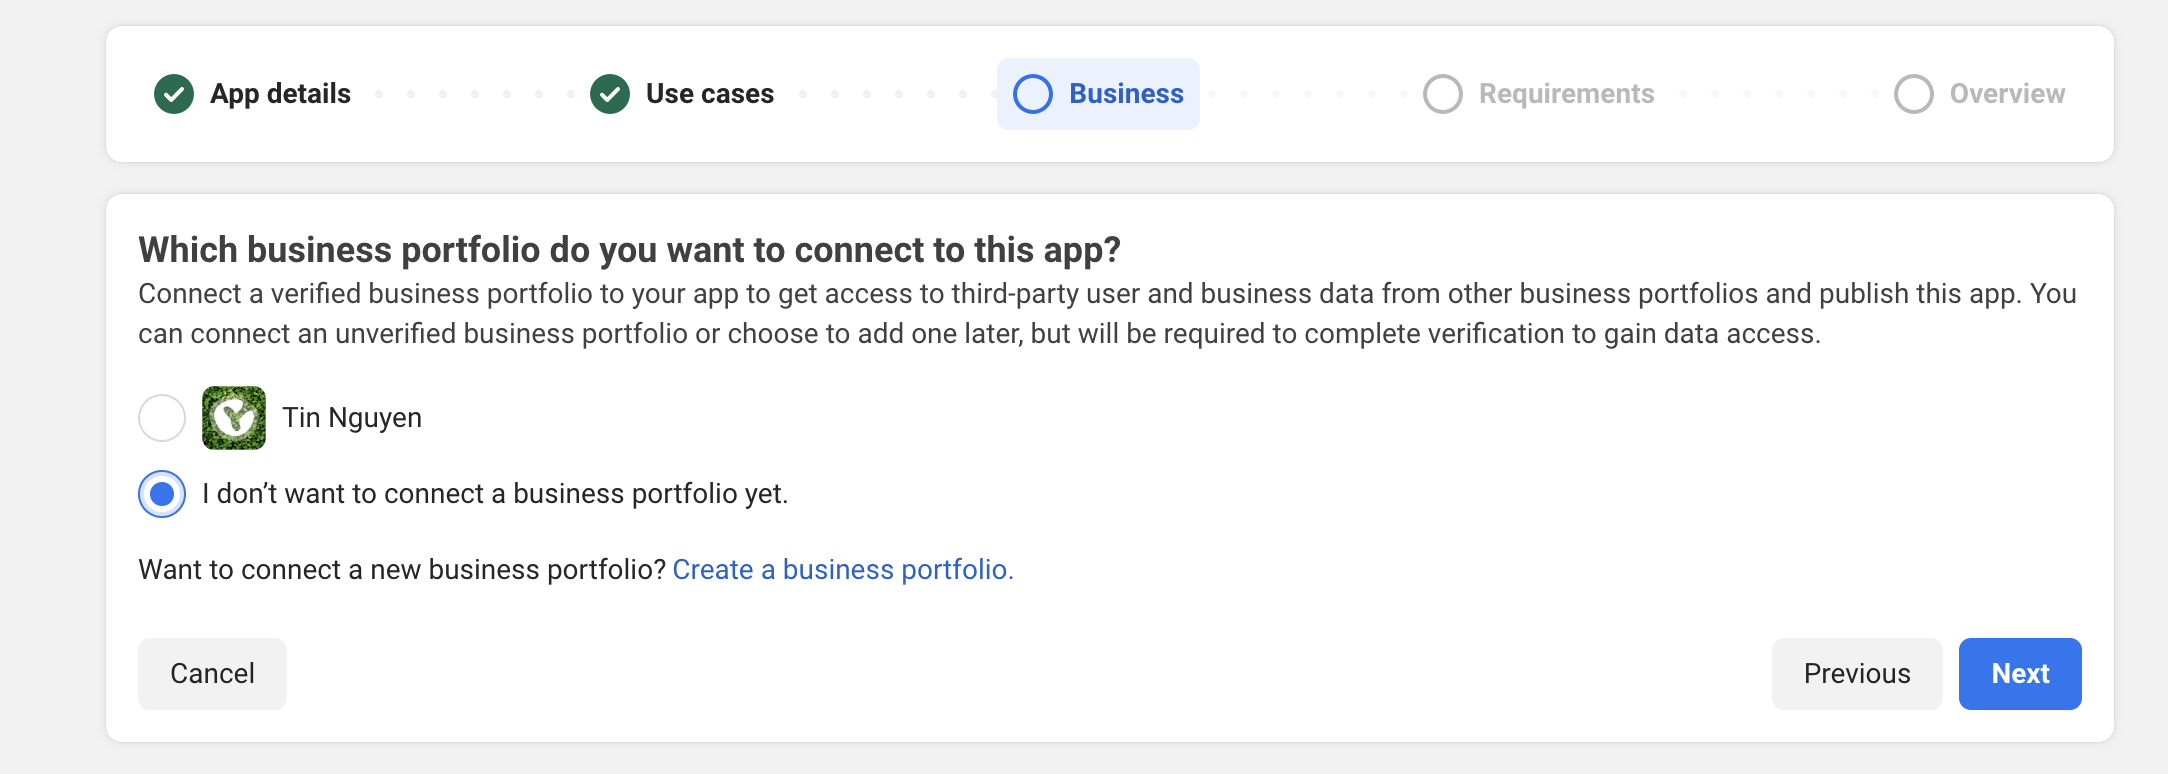
Choose a Business portfolio or continue without one. - CustomizeFinish app creation, then open Customize/Add use cases if Meta asks for more setup.
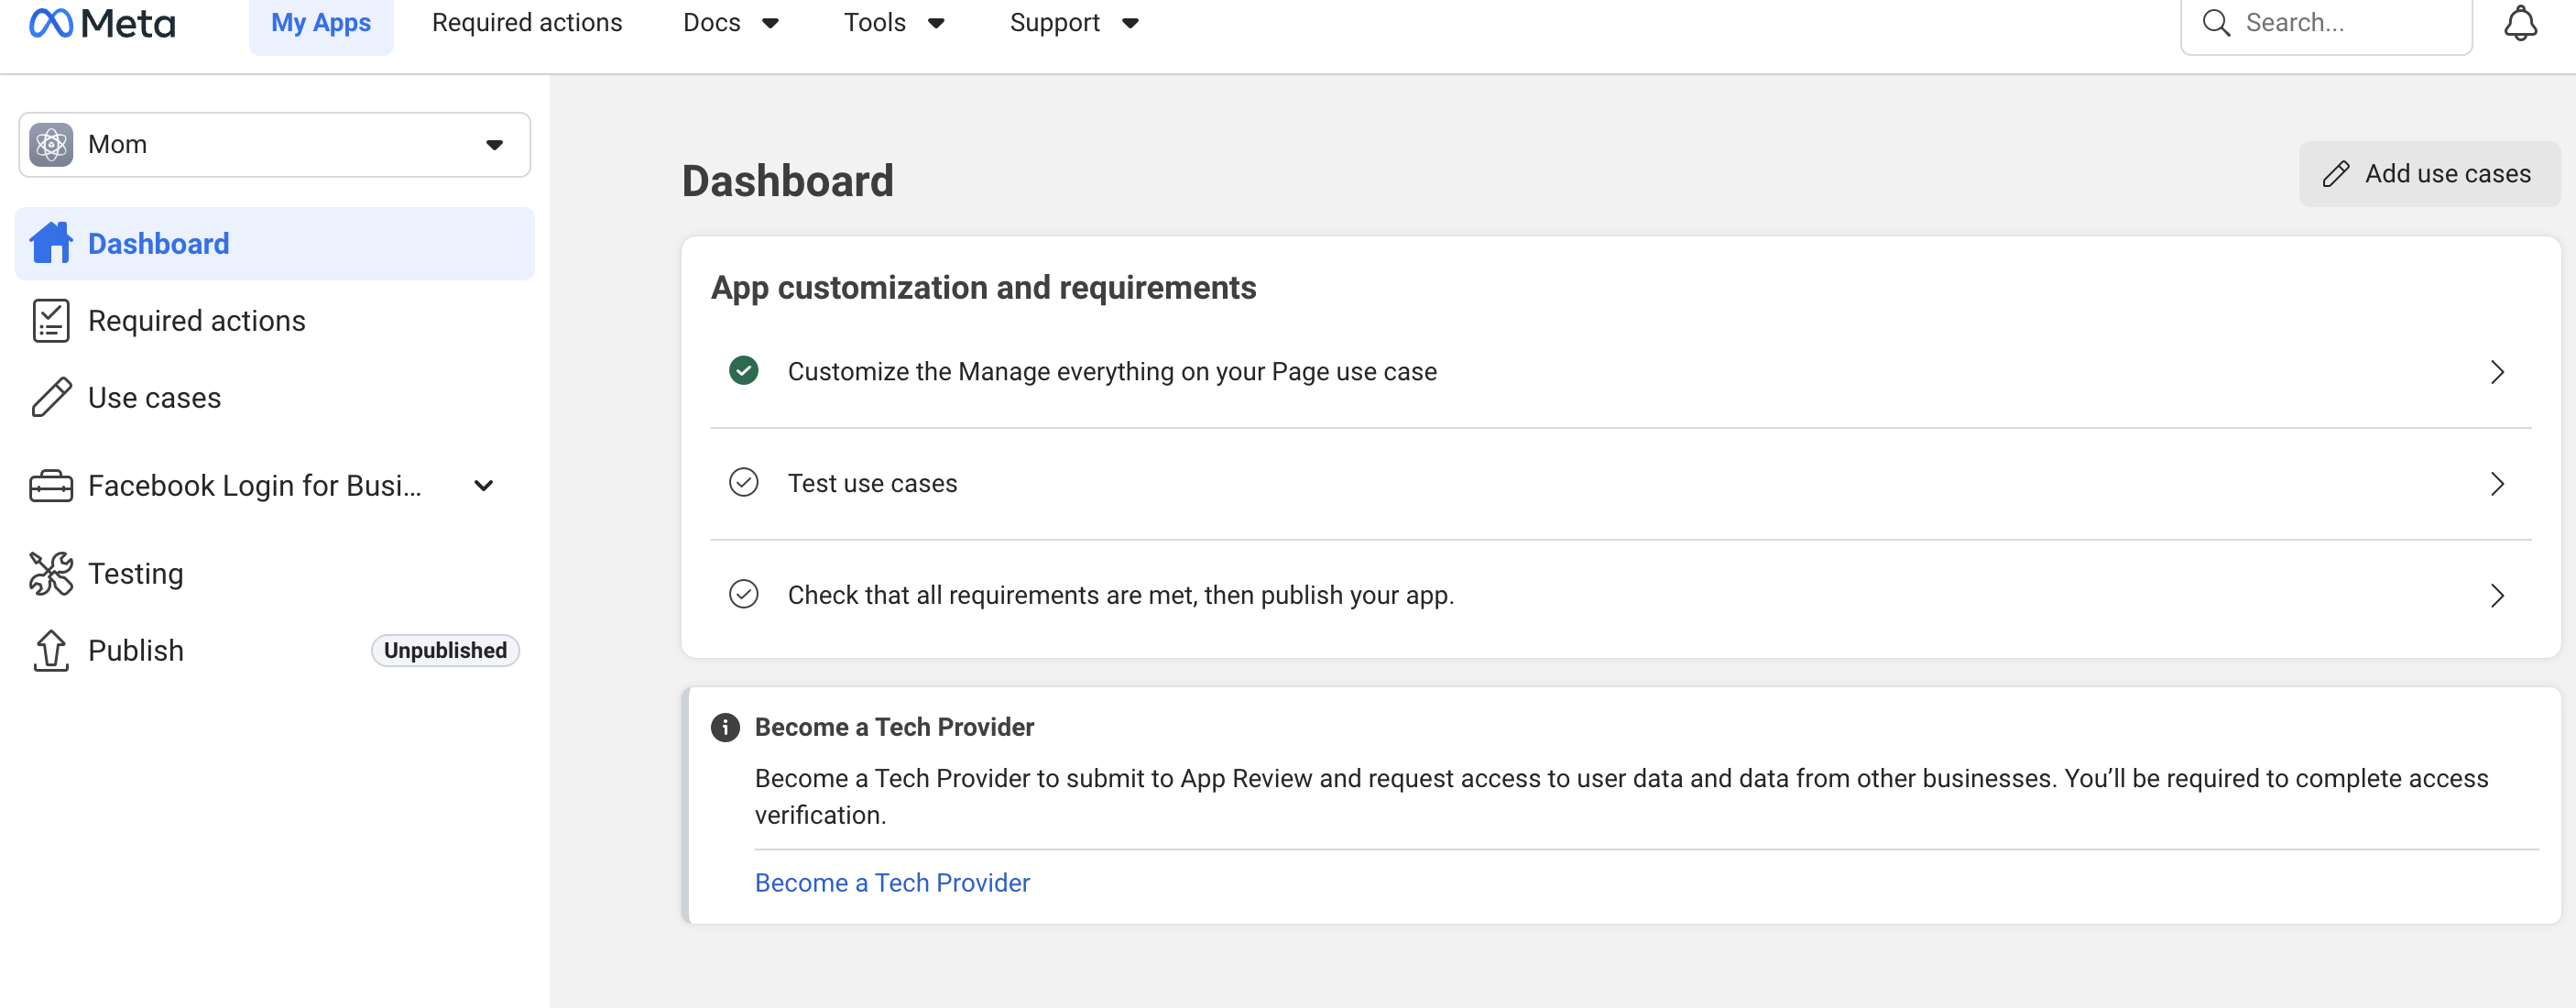
After creating the app, open Customize if you need to add the use case.
2. Add Page permissions
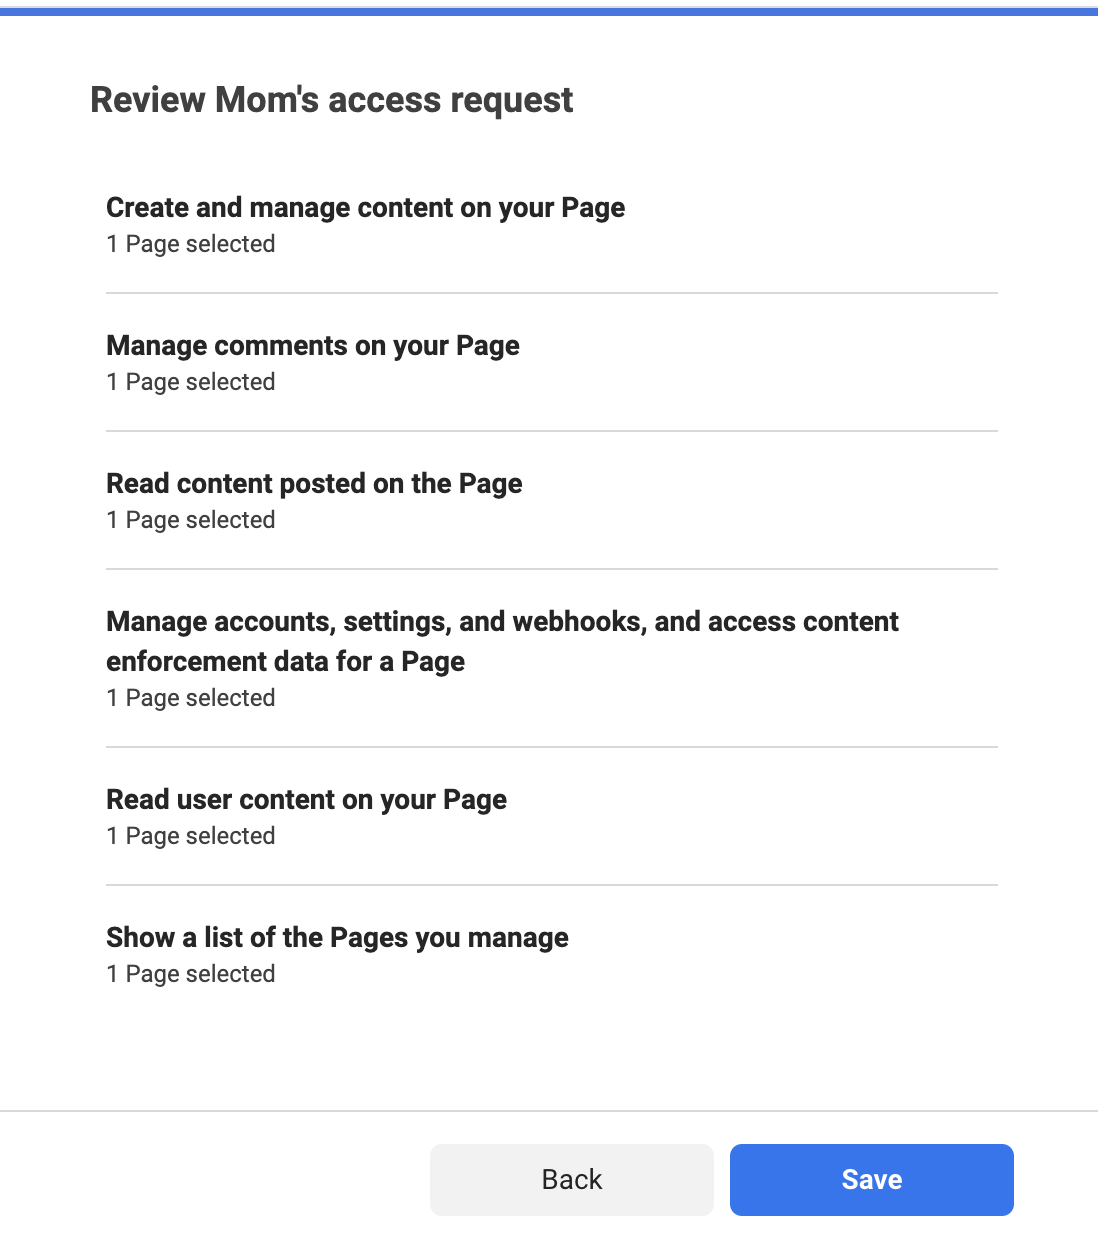
- Add the Page permission setIn Use cases/App Review, add pages_show_list, pages_read_engagement, pages_read_user_content, pages_manage_posts, pages_manage_metadata and pages_manage_engagement. public_profile normally accompanies Meta sign-in.
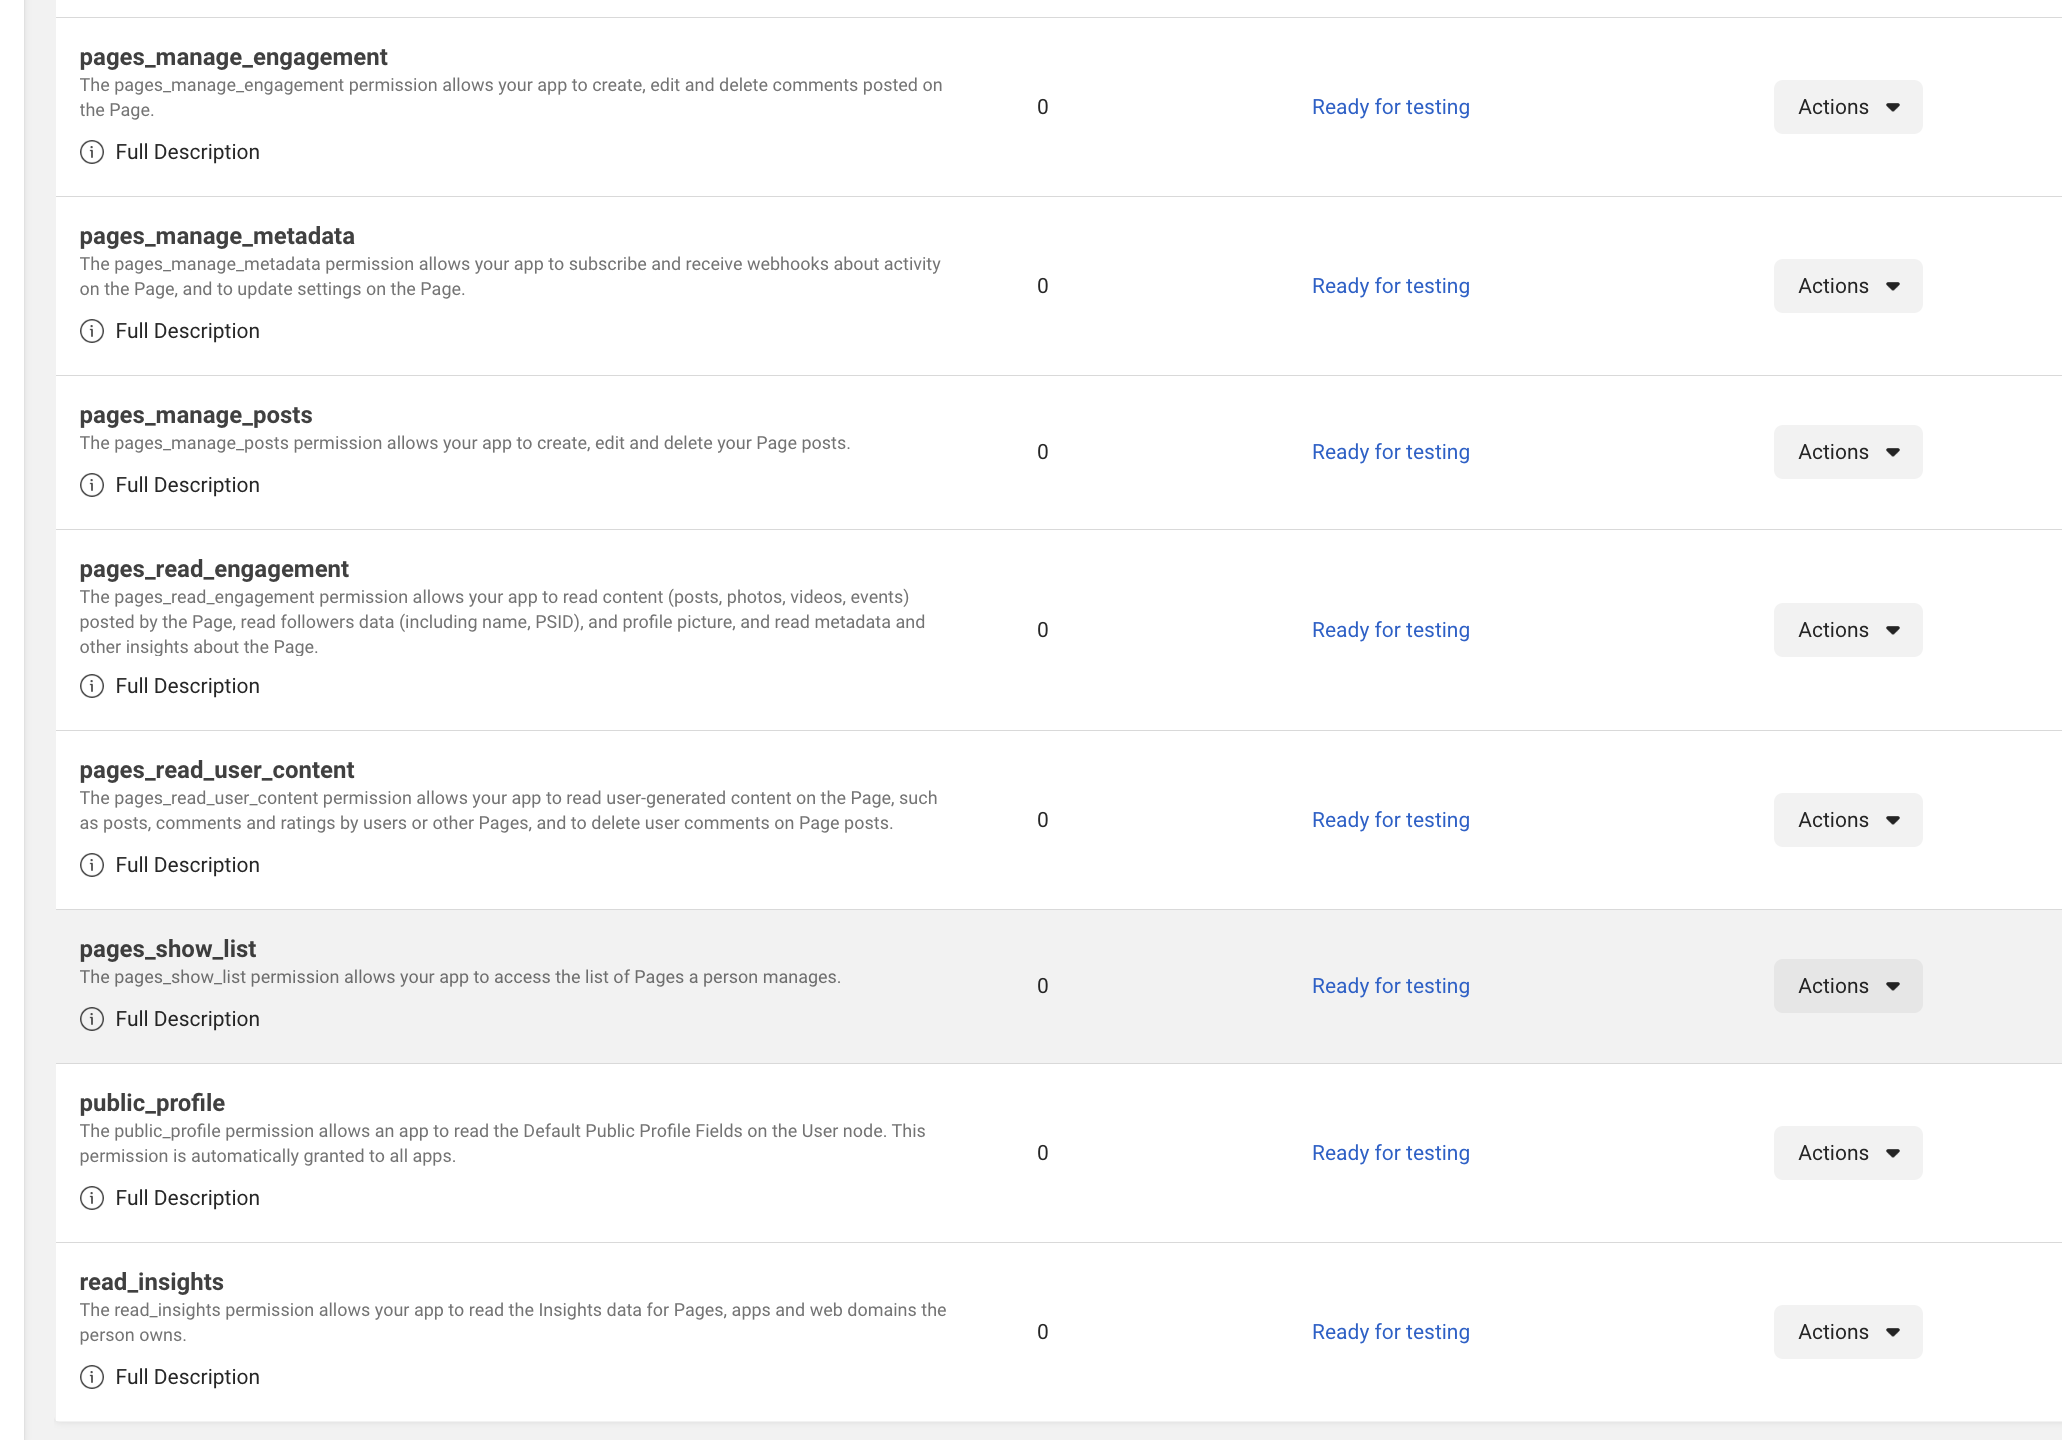
Add the Page permissions shown here. Ready for testing is enough while you are testing.
3. Generate and extend the Page token
- Open Graph API ExplorerOpen Graph API Explorer and select your Meta app at the top of the page.
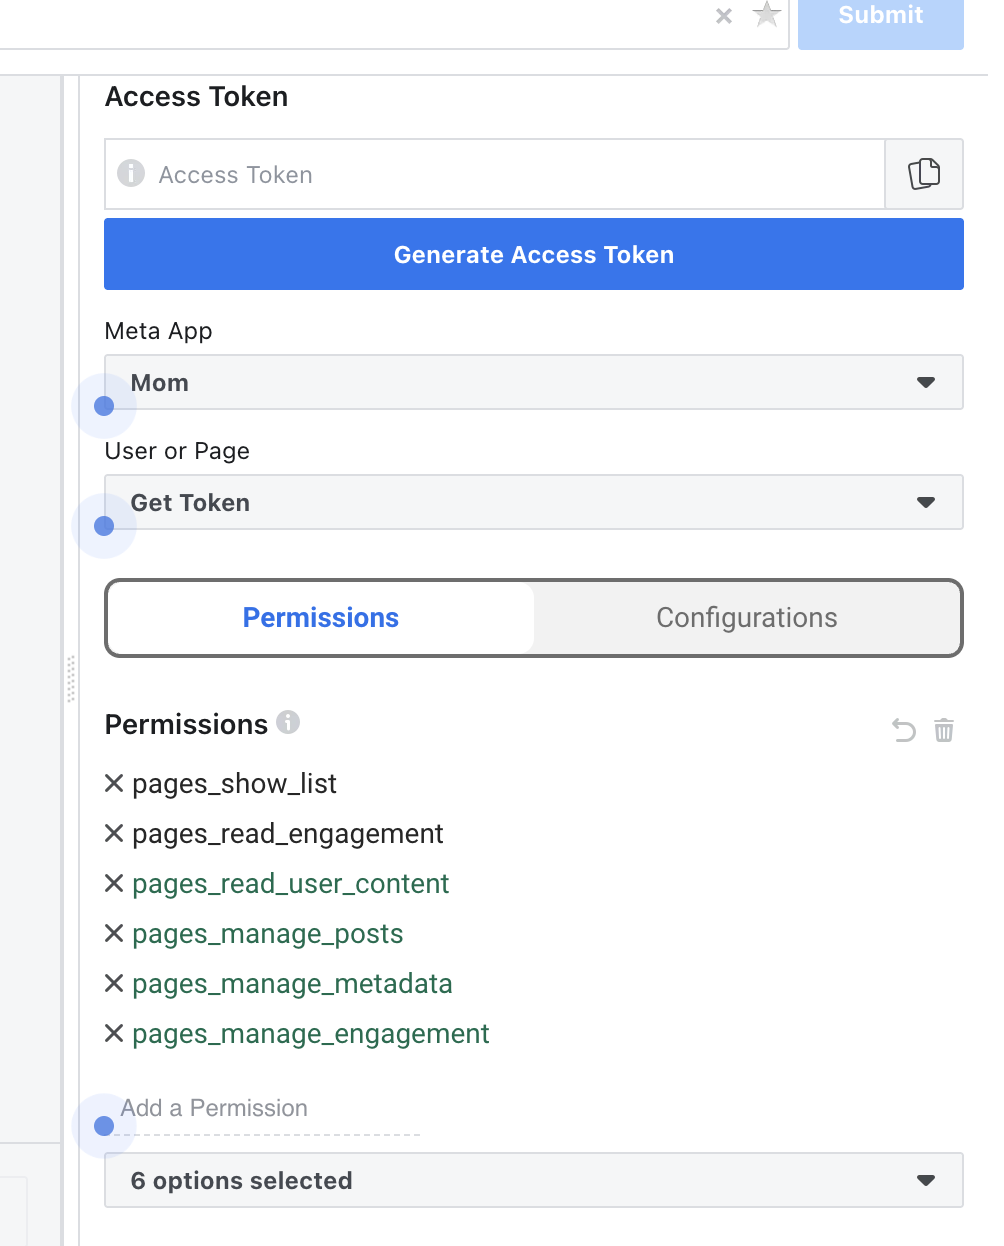
Select the app, then tick the Page permissions before Generate Access Token. - Get User Access TokenChoose Get User Access Token, tick the Page permissions, then Generate Access Token.
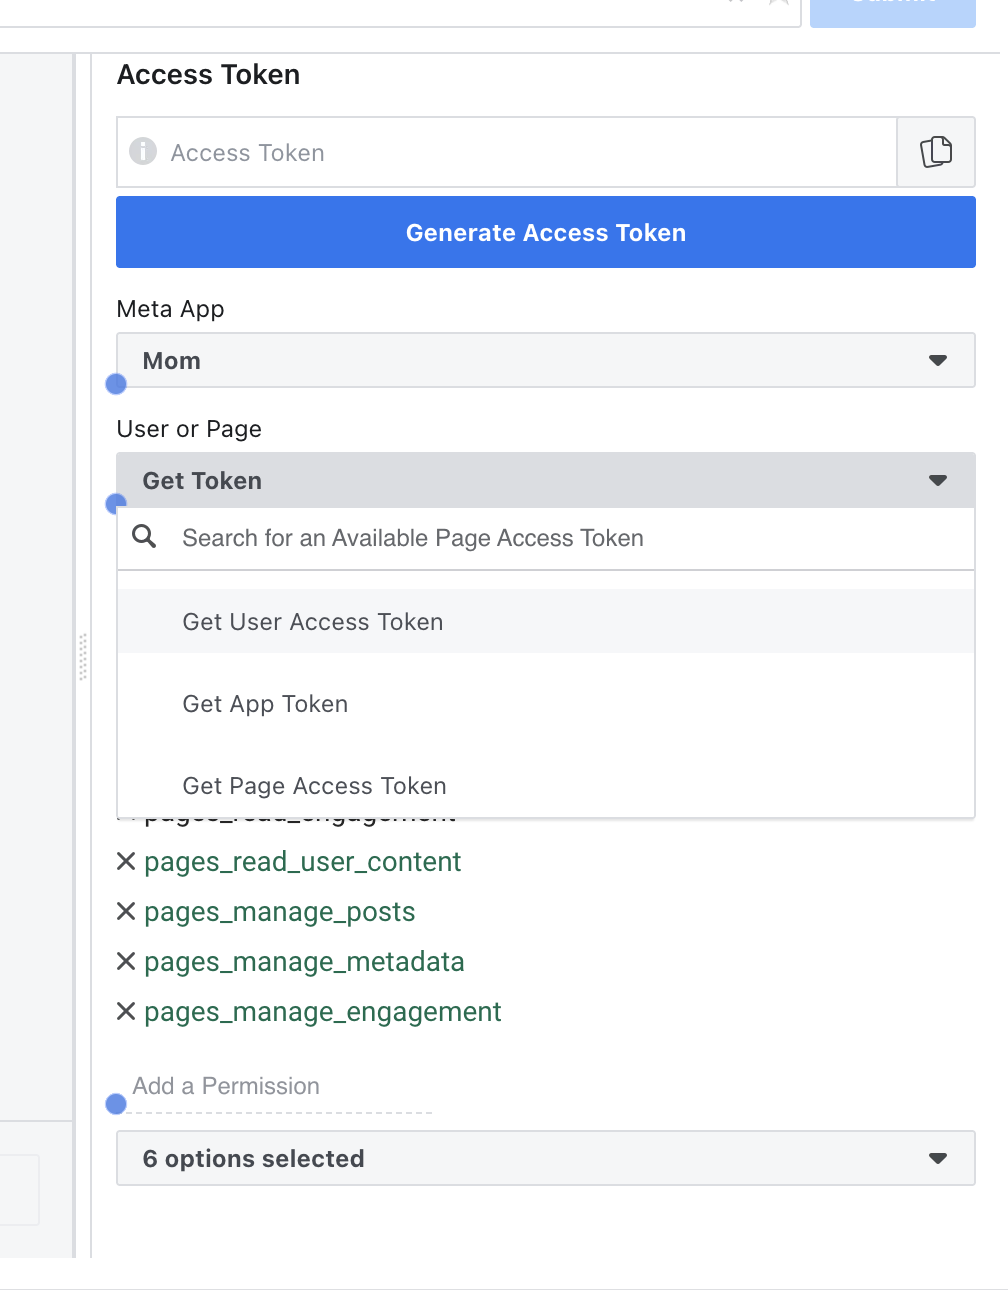
Choose Get User Access Token, tick Page permissions, then Generate. - Choose the PageIn the permission window, select the Page you want to connect and allow the requested permissions.
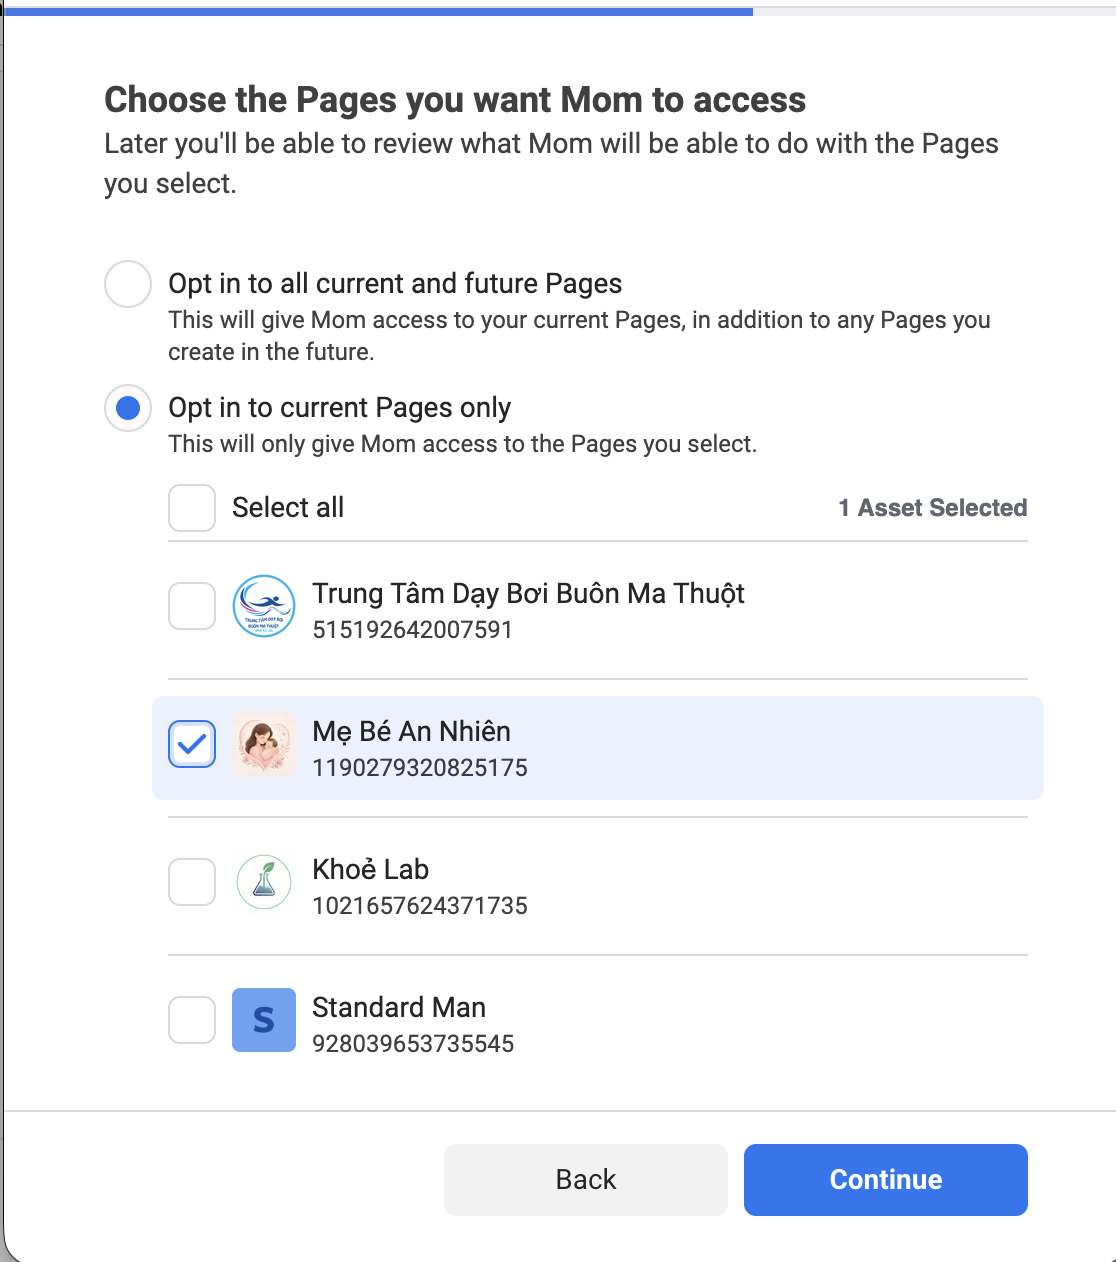
Select the Page that will publish Reels, then allow the permissions. - Switch to a Page tokenBack in Graph API Explorer, change User or Page to the Page and generate the access token again.
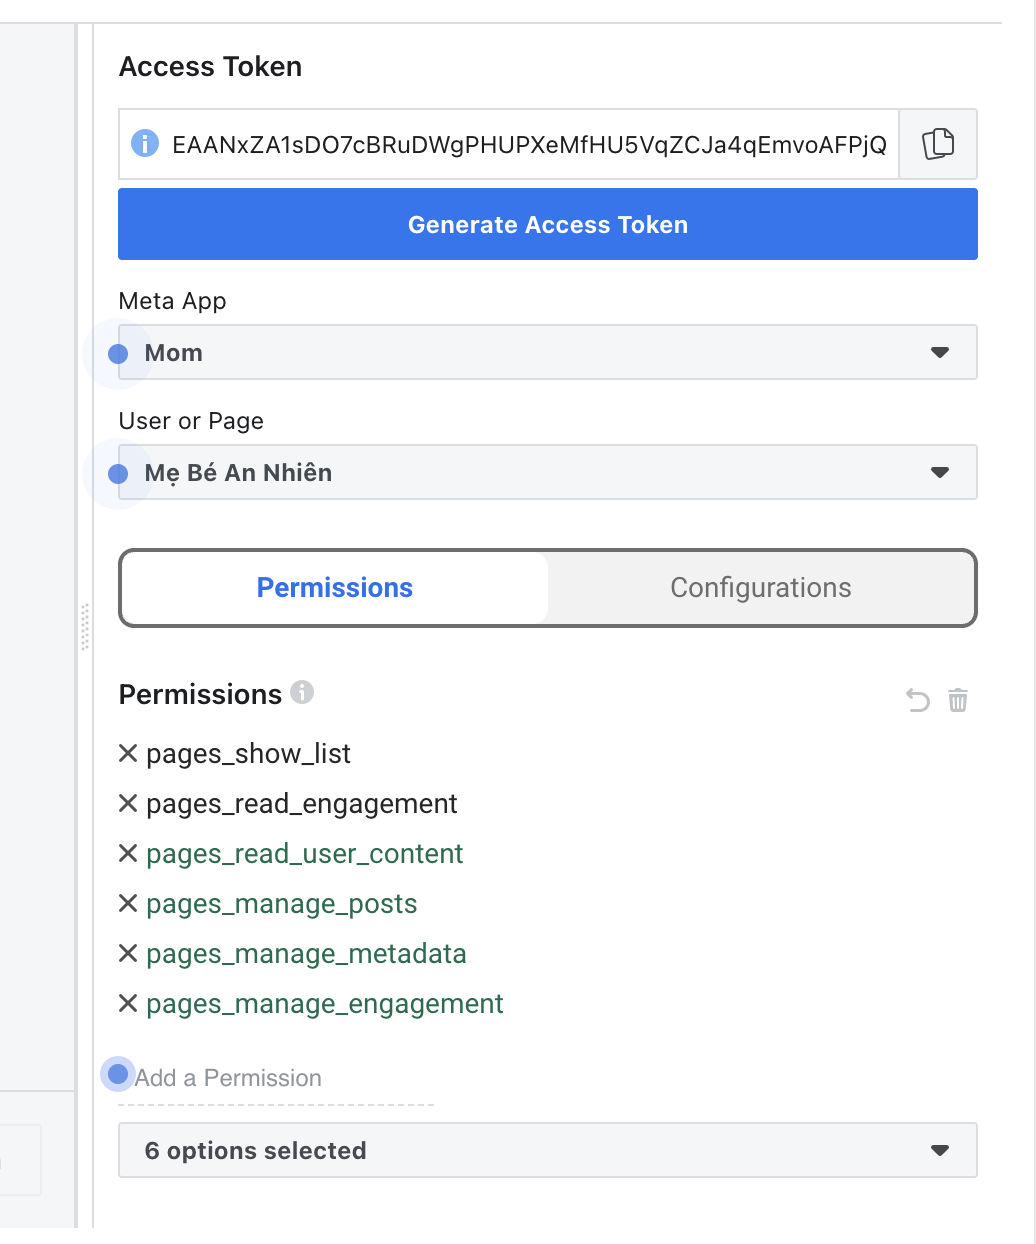
Choose the Page instead of User, then Generate again to get a Page token. - Confirm the permissionsThe Explorer permission list should show the full Page permission set.
If the Page permissions are listed, the token type is correct. - Extend the tokenCopy the token into Access Token Debugger, choose Debug, then Extend Access Token. Copy the extended token. About 3 months of expiry is normal; extend it again when it expires.
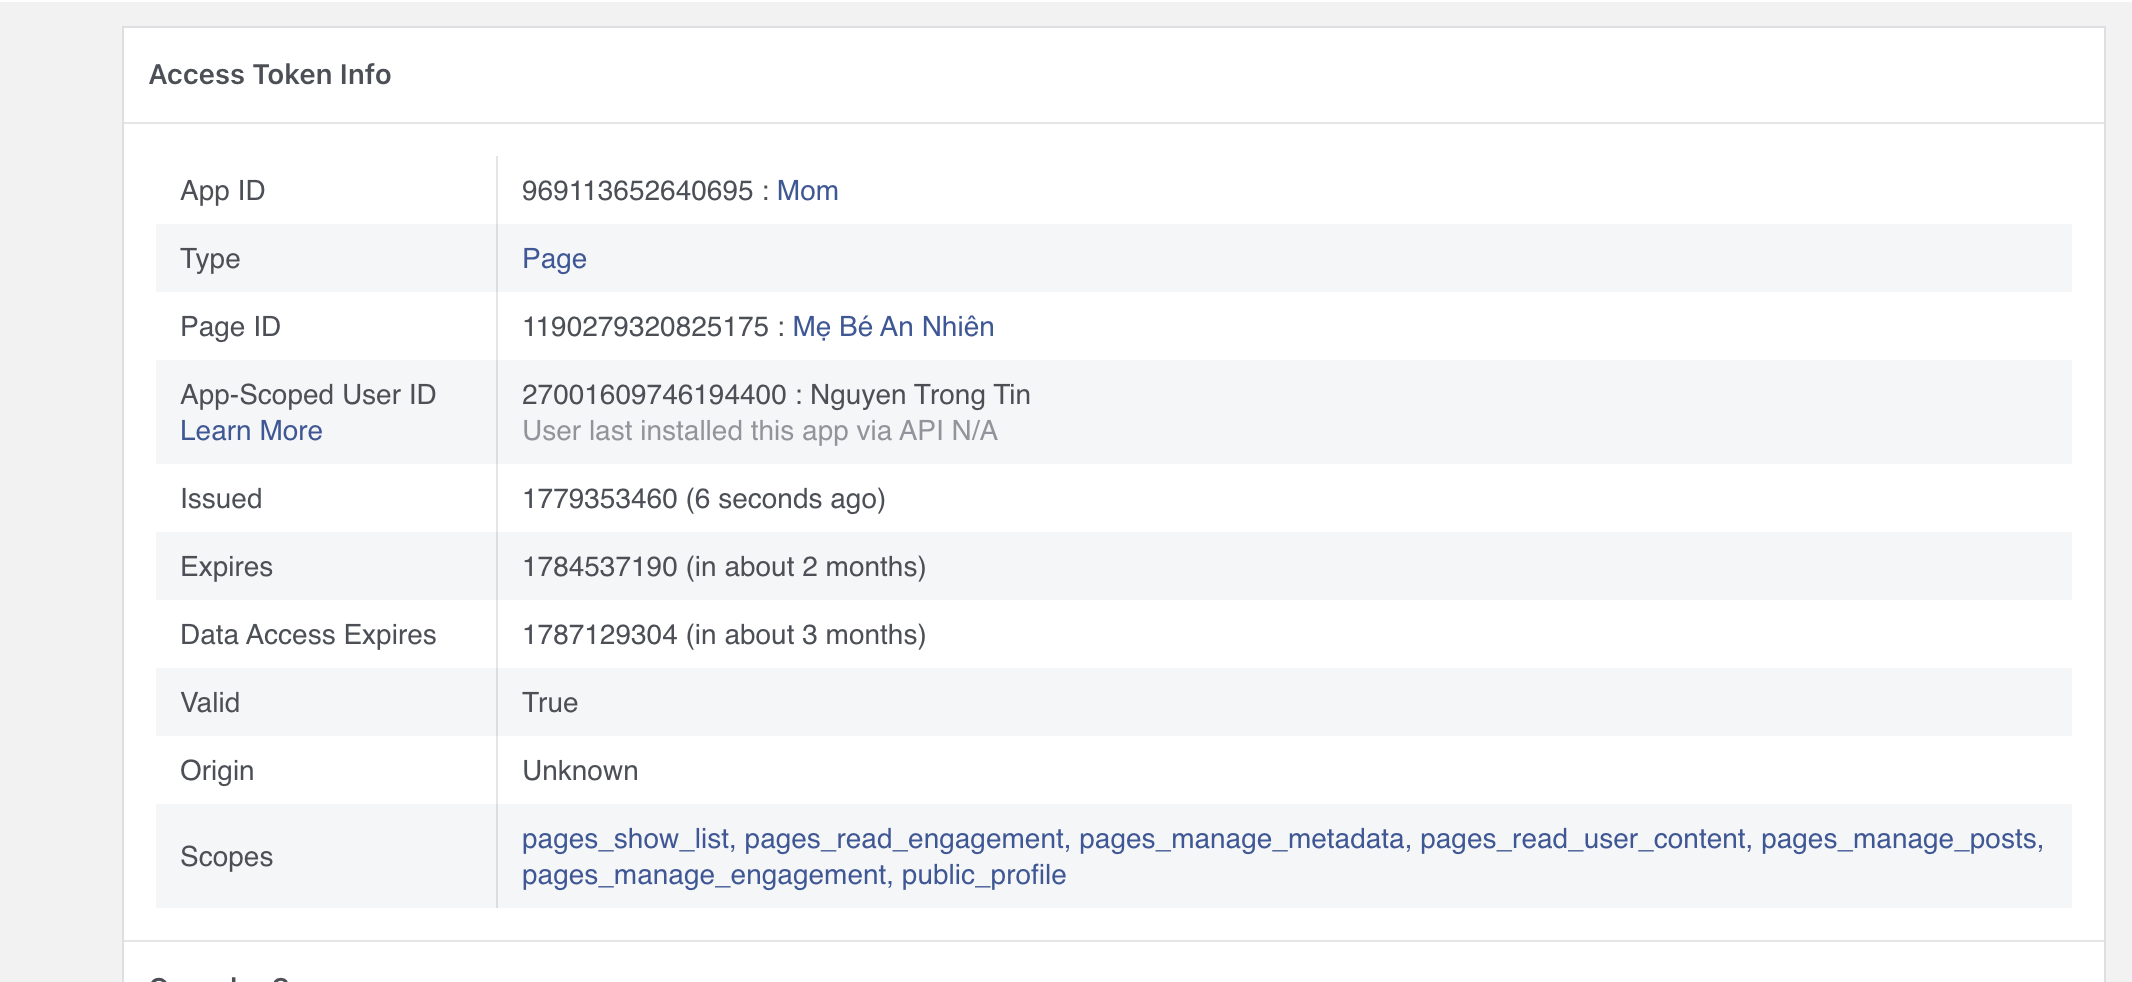
Debug the token, choose Extend Access Token, then copy the new token.
NoteNever publish an access token. Revoke and replace it immediately if it is exposed.
4. Save and publish in Escbase
- Open Add Page, paste the Page ID and extended Page access token, then save. The token stays on this computer and is not shown again.
- Choose Draft, Publish now or a schedule, then review the caption and upload.
- Facebook Reels have no separate title. Escbase keeps the source URL in Source comment and sends it only after the Reel is published.
5. Take the app Live
A Development/Testing app is normally limited to admins, developers and testers. To publish Reels for a real Page, the app must be Live. Watch the video first if you want, then follow the steps below.
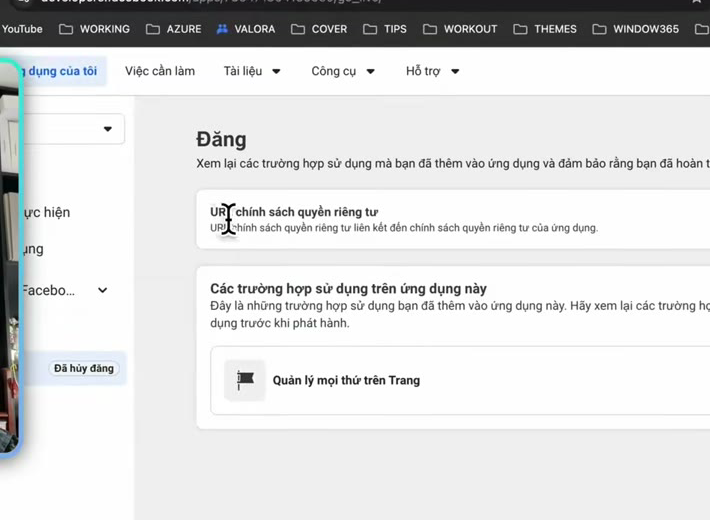
- Create a Privacy Policy URLMeta requires a Privacy Policy URL. You can generate a hosted page, copy the URL, then paste it into Meta.
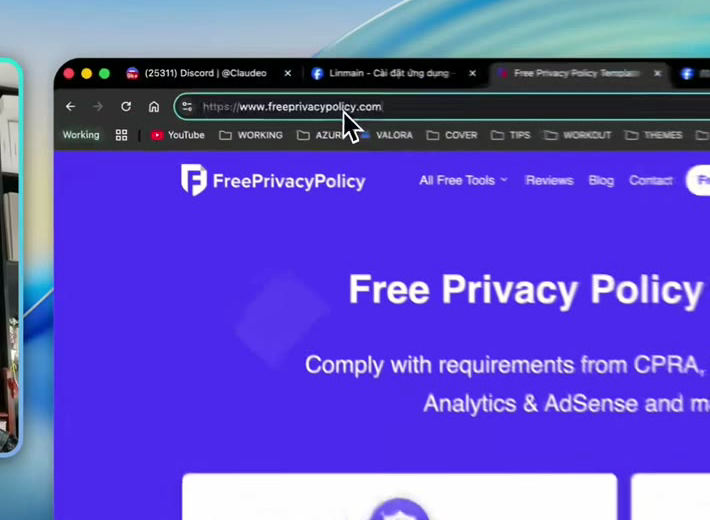
Create a Privacy Policy URL and copy the hosted link. This is required to go Live. - Paste it on Go LiveOpen Go Live. Paste the Privacy Policy URL and confirm the Page management use case is on the app.
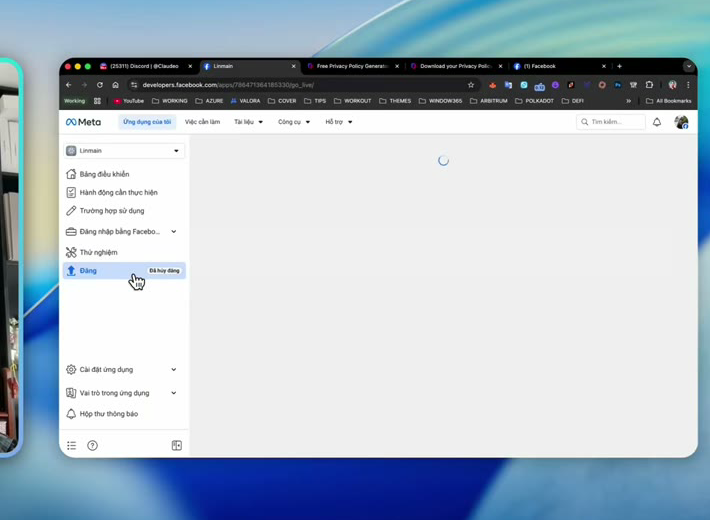
Paste the Privacy Policy URL on Go Live before publishing the app. - Publish while UnpublishedThe Publish sidebar still shows Unpublished. Choose Publish, finish any remaining Meta items, then make the app public.
Choose Publish while the status is still Unpublished. - Confirm LiveWhen finished, Publish changes to Published. A Live app can publish Reels for Pages outside tester accounts, depending on whether Meta still requires App Review.
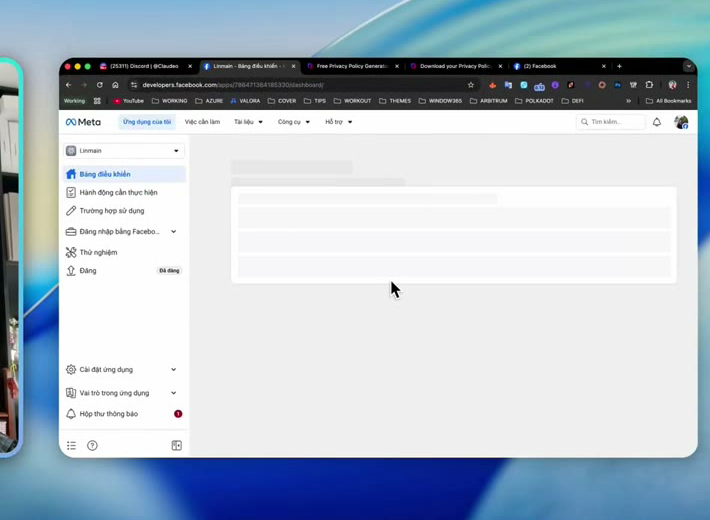
Published means the app is public.
NoteComplete both the Privacy Policy and Publish steps as shown in the video. For App Review, prepare a demo of a user selecting a video and publishing it to a Page they manage.
6. Common errors
- OAuthException or invalid token: the token expired, is for the wrong Page, or is missing permissions; generate or extend a new Page token.
- Cannot publish: confirm the account can create Page content, the app is Live, and the permission set is complete.
- A failed source comment can mean the Reel is still processing; wait until it is published, then retry the comment.
09
Fix common issues
When something blocks you
Most issues are session, voice keys, engine download, or platform OAuth. Send a screenshot to Messenger if you are still stuck.
App and Google session
- “Supabase could not verify the Google session” / phiên Google: sign out, sign in again, then retry.
- Pro from the website missing in the app: confirm the same Google account, wait a few minutes, or refresh account.
- First launch stuck: check the network; the engine download needs HTTPS to www.escbase.xyz.
Audio and render
- ElevenLabs errors: check key permissions (including Forced Alignment), Voice ID and remaining credit.
- Gemini errors: confirm the AI Studio key, that Gemini voice is selected, and free-tier daily quota (~10 TTS calls).
- Render stuck at 0%: make sure you are signed in and online so the export permit can be issued.
YouTube and Facebook
- redirect_uri_mismatch: paste the exact callback URI from Escbase into Google Cloud.
- YouTube invalid_grant: remove the old Escbase permission in Google Account → Security and connect again.
- Facebook permission errors: confirm Page role, app Live/tester status and token expiry.